The Professional Adventure Writer
A graphic adventure writing system for the Sinclair Spectrum computer.
Download PAW for the ZX Spectrum to be used with a suitable emulator.
Contents
Introduction
Getting Started
Concepts
Writing an adventure
Start typing
Playing the game
Objects
Process & Response
The Bird
The Dog
Do it yourself
Overlays
Text Compression
The Character Editor
The Graphics Editor
End of the road
Introduction
Welcome to the world of adventure writing...
The Professional Adventure Writer (or P.A.W. as it is more commonly known) provides you with the facilities to produce high quality graphic adventures (in machine code) of equal or better quality than many commercially available.
PAW will provide you with the basic framework for writing a game, but it is still up to you to provide an imaginative storyline and original puzzles.
The manuals supplied with PAW cover all aspects of its use, this manual provides a tutorial covering its use in constructing an adventure and we would recommend you work your way through this manual and its accompanying examples before attempting a game of your own. The other manual provides a detailed breakdown of the entire system and can be used as a reference guide while writing your own games.
Good luck...
A great deal of time and effort has been put into ensuring PAW deals with all conceivable situations in a logical and useful manner this has resulted in a complex program of some 20K in size, and it is entirely possible that somewhere deep within the code a few well hidden bugs remain, indeed a well known quote states that; "Testing only proves the presence of bugs, not their absence".
Getting Started
Within this tutorial any input that may be required by PAW is shown enclosed in brackets e.g. [A 1 BAG], if the surrounding text requires the entry to be made type exactly what is within the brackets - including any spaces - but not the brackets themselves. Several special keys are shown by using their name in capitals (upper case), e.g. ENTER,CAPS SHIFT etc. do not type these in full, just press the required key (or combination of keys).
Concepts
It is probably a good idea at this stage to introduce some of the more important concepts which PAW embodies in its design.
Overlays
For many years it has been common practice for very large programs on disc based machines to be split into two or more parts which are then loaded as required. This system has not been featured greatly on tape software due to the serial nature of tape storage. PAW uses a very simple form of overlay to allow maximum free memory on both 128K and 48K spectrums which is quick and easy to use. The system uses the free memory available on each machine to store the overlays until such time as that memory is required and/or overwritten, they are then pulled in from cassette as required. On a 128K spectrum you will not need to worry about overlays until the last 16K is required (i.e. after you have written a game about 92K long!). On a 48K the overlays will come into play when you need to use graphics or have entered about 16K of program. The tutorial in this manual does not need to use overlays so their use is deferred until a later chapter.
Memory Paging
The 128K spectrum uses a system known as paging to provide its extra memory, diagram 1 should help to visualise the arrangement where the top 16K of memory can be shuffled along like a slide in a projector to present one of five 'pages' to the computer which can only 'see' 64K at any one time.

Note that pages 2 & 5 are the memory
area where PAW is located and are thus
unavailable. Note also that memory
shown as 'overlay' will be used by
PAW if required (see overlay section).
Databases
PAW stores your game in a 'database' (a collection of tables and information which define the game you are writing). Initially the database is very small with only the words and commands common to every game already defined. This database gradually uses the area of memory shown as free on diagram 1. PAW can also make use of the other pages, but, on a 48K spectrum the extra pages are not available and you will thus not be allowed to try and use them. This also means that if you are writing on a 128K spectrum and you want your game to run on both a 48K and 128K spectrum you must not use any page other than the main page (page 0).
Parser
Back to school for this bit:-
parse v.t. to classify a word or analyse a sentence in terms of grammar. parsing n. (Minster English dictionary)
PAW features a fairly powerful parser to convert what the player types when playing your adventure into a series of simplified 'Logical Sentences' (LS's) to which you will have defined the responses. The parser does this by extracting 'phrases' from the input string one at a time and allowing the rest of PAW to interpret their meaning. Phrases are separated by any punctuation mark and the conjugations 'AND' or 'THEN' (Although you can change this if required), when it runs out of phrases in the current input string it will request another. A phrase consists of at least a Verb (a doing word!) and optionally two Nouns (which describe objects), an adverb (which modifies the verb), a preposition (shows the relation of one Noun with another word) and finally a string enclosed in quotes which is used for speech to other characters in the adventure.
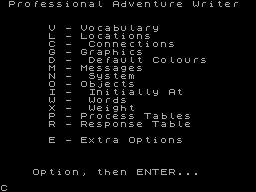
The Menus
From the main menu (displayed after pressing a key on the title page) you can select all of the options in PAW by typing a single letter (in capitals) followed by ENTER, this letter is usually the first letter of the option to allow you to easily remember them (they are of course always displayed anyway). The main menu is split into two parts and option E allows you to switch between them, the menu displayed initially shows all the functions related to writing the game, if you now type [E ENTER] - i.e. Capital E and the ENTER key. The other menu should be displayed which contains all the options related to saving loading and testing your game. (also the character designer and text compressor which are dealt with later in the manual.) If you should get in the message 'Load Overlay?' you have selected as option which requires an overlay to be loaded so type [N ENTER] to get back to the main menu as we don't need these just yet.
The Edit Line
This is very similar to the editor provided by the INPUT command in BASIC, you can use the cursor LEFT and RIGHT keys to move through anything you type, and DELETE to delete the character to the left of the cursor as usual. EDIT must be pressed twice (or held down until it repeats) to clear anything you have typed and cursor DOWN pressed twice (or held down!) to abandon the current text (this is different to clearing the text as it will leave any text you may be editing unchanged in the database).
Free Memory
Option F on the main menu will show how much memory remains free in each page you have available (i.e. only page 0 will be displayed on a 48K spectrum.) In addition it also shows the highest location and message used so far, the reason for this wonderfully useful bit of information will be explained in more detail later. Pressing any key will return you to the main menu.
Saving, Verifying and Loading the database
Obviously you will not be able to finish typing in a game in only one session, and indeed you should not attempt to enter large quantities of information in one go as any interruption to the power supply (or fault in the computer) can cause the loss of a lot of hard work! These options allow just the contents of the database of information to be stored on a tape in a 'file' (collection of information or data) and recalled at any time.
Selecting option S will request a filename to save the database under, this should be meaningful and usefully could contain a version number, e.g. DEMO01. The database will then be saved in several parts (PAW saves two files per page, changing the last letter of the name to A,B,C etc for each file used).
Option H (Verify) will allow a database just saved to be checked against the one in memory - if a tape error should be reported then the database should be resaved with Option S onto a different tape if necessary.
Finally option J will request the name of a database file to allow a database saved previously to be reloaded into PAW, overwriting any database already present. Should you get an error during the loading of a database, the database area will be 'corrupt' (i.e. not in the form PAW likes!) and the only safe option to use is J until a database is successfully loaded, any other options may cause damage to the PAW program itself necessitating a reload.
RULE: Save your database regularly onto different tapes so that you always have a reasonably up to date version should disaster strike.
Writing an adventure
Now the fun starts...
Planning
Planning you game is very important if you want to create a professional result, it is no use sitting at the machine and typing away in fits and starts as you wait for inspiration! You will merely entangle yourself in a maze of numbers and words with no recourse but to start from scratch anyway.
To illustrate the recommended approach to writing an adventure we will consider the design and development of a simple game from initial idea to final testing.
Remember to save your database regularly!
Getting an Idea
This is always the hardest part of creating anything! An original storyline can provide a game with an interest which rescuing a princess will probably not evoke in a modern adventurer.
Subjects for adventures are all around in many day to day actions, in exotic places around the world and out of this world!
If you decide to base a game on a book or a film you have enjoyed and intend using it commercially make sure you have obtained permission from the original author or copyright owners.
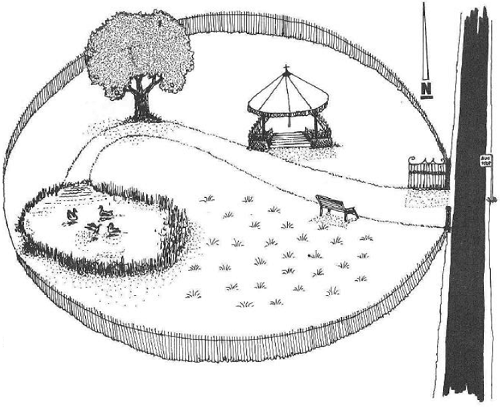
For our sample we will use a simple problem which besets a passenger on his/her way home:-
While standing on the bus stop the passengers' ticket blows away into the breeze and is carried away by a small bird into an adjacent park, the computer will play the part of the passenger who you must direct to find the ticket before the bus arrives.
Game design
Now you have the idea, it is worth drawing a rough sketch of the area the game will take place within as we have done in diagram 2 (well actually our artist drew it...).
Note that any game design ought to be within a logically enclosed area or the player will wonder why they can't go in a direction when nothing appears to bar the way.
An adventure consists of a number of 'discrete' that is separate, 'locations' or places, the player can visit. You must now decide which areas can become a location and number them individually.
Try to make the scale consistent or logical (unless the game is illogical by intent!) as a single step into an airport earlier described as 10 miles away doesn't help the impression of realism, you can introduce a method of transport such as a taxi etc if needed. Now location 0 is always reserved as a title screen for a game and we want location 1 for a special use later so we number the locations from 2 upwards.
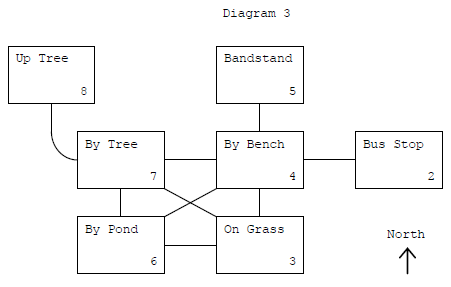
For our example we have chosen 7 locations as follows:-
2 The Bus Stop.
3 On the Grass.
4 By the Bench.
5 The Bandstand.
6 The Ornamental Pond.
7 By the Tree.
8 Up the Tree!
To clarify the layout and to work out the possible movements diagram 3 is a block diagram showing a stylised map of the game.
Now we can start to write the contextual description of each location, try not to make them a dry and uninteresting monologue on the state of the nation, short and snappy is just as effective in creating an atmosphere if a little imagination is brought to bear. Remember to stick to one form of address ('I' or 'You' usually) or the player will suffer a serious identity crisis.
Note that if you use 'You' as a form of address you will need to change the system messages, see the technical guide for details.
Start Typing
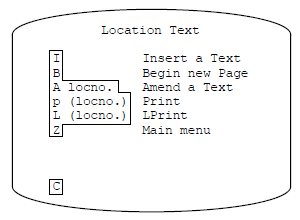
Select option L on the main menu for Locations [L ENTER] i.e. Press L in capitals followed by ENTER. A small sub-menu will be displayed which shows the options available to deal with entering and amending location descriptions. All the menus in PAW are laid out in a similar way so we will examine these options a little more closely, see one menu you've seen them all!
...should now be displayed on your screen.
Anything you type will appear at the bottom of the screen as usual, the areas in inverse give you an indication of what you must type to achieve the function shown on the right of the line. Take for example option P, type in [P ENTER] and you should see the description of location 0 (location 0 always exists as it simplifies the operation of PAW) on the screen. It demonstrates the inclusion of colours etc within text to highlight certain words. The text that exists however, must be replaced with our introduction for the example adventure, so we need to 'amend' it.
Press any key to get back to the sub-menu and type in [A 0] - don't forget the space between A and 0. This form of entry or 'syntax' is displayed on the line 'A locno.' i.e. you must type A followed by a space followed by the LOCation Number you wish to amend. Pressing [ENTER] will cause the current text for location
0 to be displayed with the cursor displayed at the end for possible editing. Now we want to clear the entire entry, so press [EDIT] (CAPS SHIFT & 1 on a 48K spectrum) twice. You now have a blank entry to work with, note that if you press Cursor DOWN twice now you will abandon the changes and an 'error' report will be displayed in the lower screen (whenever a report is displayed in the lower screen, pressing any key will return you to the last used menu) and the original text will remain. You can try that if you like and then amend ([A 0 ENTER EDIT EDIT]) again.
The text we will use for the introduction screen is going to include some colour to brighten up the title, so type eleven spaces [ ]- which will put the title in the centre of the line. next press [EXTENDED MODE] (SYMBOL & CAPS SHIFT on a 48K spectrum). The keys from 0 to 7 will now provide the paper (or background) colours which are available, we want the title which is [The Ticket]. Next the original paper colour must be restored (Black) so press [EXTENDED MODE] again and type [0].
We need to put a blank line between the title and the text, we can't press ENTER because this finishes the edit, so we need an 'Extended Screen Control Code' these are codes from 0 to 7 which serve a variety of purposes within PAW. ESCC 7 provides a newline, to enter an ESCC you need to use a 'quirk' in the editor, as follows; first press [EXTENDED MODE] and select colour White (i.e. type [7]) next press [DELETE] once which deletes the paper control but leaves the number - you guessed it 7! so the cursor jumps to the start of the next line. Do this again to give a blank line and type in the remainder of the introduction as follows, don't attempt to stop words breaking over lines as PAW does this automatically when the game is running (i.e. It formats the text):
[While standing on the bus stop my bus ticket has been blown away, can you help me find it?]
When you have finished press [ENTER] to finish the edit and then anykey as requested to return to the sub-menu. You can use option P to look at your text if you like, but note that it is not yet formatted, this is done only while playing the game.
If you have a printer you might like to try option L which 'Line Prints' the text, if this causes the computer to 'hang' or appear to do nothing press [BREAK] (CAPS SHIFT & SPACE on a 48K spectrum) to get back to the menu then refer to the technical guide for further information on printers.
Option I on the menu allows a new location to be created within the game, it has no number following it because PAW automatically assigns the next available location number. Now we wanted location 1 for a special purpose which we will explain later (good these secrets aren't they!) so just type [I ENTER], you will now have a blank location available for use so just press [ENTER] again (and any key) to return the sub-menu.
Now type [I ENTER] again to 'insert' location 2, and type in the following text to describe it. Note that the spaces between "..a road.." and "..South. To.." will occur exactly at the start of new lines, due to the text formatting you must still type the spaces or the formatter will think the two words are one long word - the spaces will be 'suppressed' (removed) by the formatter where required when the text is printed during the game.
RULE: Always type the space between two words or between a full stop and the start of the next sentence, even if that space is at the start of a new screen line. It will be suppressed by the formatter if required.
The text for location 2 is as follows:
[I'm standing by a bus stop, on a road which runs North to South. To the West a park gate set in iron railing stands open.]
Right got that little lot in. Press [ENTER] to finish the edit and return to the sub-menu. From now on we will omit the 'ENTER' assuming that you are remembering it anyway, besides it saves our typing finger.
Now might be a good time to demonstrate a natty little feature which prevents you entering invalid commands on menus, try typing in [I 3 ENTER] (well one more reminder won't hurt.), you should now have a flashing question mark after the 3 along with the cursor, PAW has checked the 'syntax' (remember that?) and discovered that no number is needed after the Insert option, the cursor will always be positioned as close to the problem as PAW can get, in this case a single press of [DELETE] will suffice to get rid of the offending number (don't worry about the space as PAW ignores any superfluous ones) now [ENTER] will provide you with a blank entry for location 3. The text required for this and the remaining locations is shown below, so using your new found knowledge type in the description then insert and enter the remainder of the locations. Note that the []'s have been omitted.
Location 3
The grass on which I stand is neatly trimmed. To the North is a path and bench while to the East is an ornamental pond.
Location 4
I am on a gravel path running East to West, by a park bench, to the South is a grassy area while to the North I can see a bandstand.
Location 5
I am standing on the bandstand which appears to be made of ornate cast iron painted white. To the South is a path.
Location 6
The sun glitters on the surface of the ornamental pond, whose waters ripple in the gentle breeze. A path runs North towards a large tree, while to the East is a grassy area.
Location 7
The path curves South and East here beside a large tree.
Location 8
I am sitting on a branch in a broad leaved tree, the park is spread out before me, to the East I can see the bus stop through the gate in the railings.
Use [P] to check what you have typed, when the screen fills up with text you will see "More..." printed in the lower part of the screen, pressing any key except BREAK, SPACE or N at this point will cause another screen full of text to appear and so on until the final 'Press any key' is reached. BREAK, SPACE or N will cause a 'BREAK error and allow you to exit the listing.
Great now we have a collection of locations, but no way to get from one to the other!
That leaves two options to discuss; B is to begin a new memory page on 128K machines - do not do that at the moment as the demo game will fit easily on page 0. The option is dealt with is the chapter on 128K considerations in the technical guide.
So we use the last option, Z which it should be obvious takes us back to the main menu, so type [Z ENTER] (oops another ENTER!).
Connections
Select option C from the main menu, type [C], and you will be presented with a sub-menu again similar to that for locations. Notice that entries can be Amended (A), Printed (P) or Line Printed (L) only, the reason is that PAW inserts a blank entry in the connections table every time you insert a location. If you use option P to look at the table, type [P], you will see the blank entries for locations 0 to 8.
Looking back at our map we can see the interconnections required between the locations, for location 2 (the bus stop) we need a single movement WEST which will take the player to location 4.
So type [A 2] to amend the entry for location 2 and type [WEST 4] which instructs PAW that when the player types the word West when in location 2 they are to be moved to location 4!
If you now use option P to examine the entry (note that [P 2] will print only the entries from location 2 onwards) you will discover that it looks something like:-
Location 2 W TO 4
.etc
This is because PAW knows that 'W' is synonymous with 'WEST' (A synonym is a word which means the same) and PAW will always use the shortest synonym it knows when printing (indeed it will also use it if you amend the entry a second time).
For location 3 (the green) we need three connections:-
NORTH to 4, WEST to 6 and NorthWest to 7.
'NW' is the word paw understands for NorthWest so amend the entry for location 3 by typing [A 3] and type in the following exactly as printed (again we have omitted the []'s and will do so in future for entries that are displayed on a line of their own):
NORT 4 WEST 6 NW 77
when you press [ENTER], PAW will place the flashing 'syntax marker' after 'NORT' because it does not know the word, add the [H] to make it [NORTH] and press [ENTER] again, this time the marker will be displayed after the 77 because PAW does not know of a location 77 (in fact ther are no locations higher than 8 yet in our game) this is another example of the syntax checker at work, it will usually prevent you entering silly of illegal information. So delete one of the sevens by pressing [DELETE] and press [ENTER] to complete the edit.
The remaining connections are as follows (in abbreviated form to save you some typing):-
| Location 4 |
N 5 |
E 2 |
S 3 |
SW 6 |
W 7 |
| Location 5 |
S 4 |
SW 7 |
|
|
|
| Location 6 |
N 7 |
NE 4 |
E 3 |
|
|
| Location 7 |
U 8 |
NE 5 |
E 4 |
SE 3 |
S 6 |
| Location 8 |
D 7 |
|
|
|
|
'D' and 'U' are short for DOWN and UP respectively to allow the player to go up and down the tree (SW is SouthWest, NE is NorthEast and SE is SouthEast!).
Finally amend the entry for location 0 so that a movement will take us to location 2 where we start the game (there is a better way than this which needs a table we haven't come across yet so
is best left till later). Typing [A 0 ENTER NORTH 2 ENTER] from the sub-menu will achieve the required effect.
Check these thoroughly against the map and the list and when you are happy that they are correct, reward yourself with a cup of tea after saving the database for safety. Just to remind you; use
option Z to return to the main menu and option S from there to save the current database (you can also use option E to see the other main menu if you want.).
Playing the Game
A suitable time has now arrived to try out the game. The option to test the game is T on the main menu, if you now select it, by typing [T], you will be asked whether you require diagnostics,
for the moment just type [N ENTER] (oops, another one of those ENTERs) for no, as we don't know what diagnostics are, and indeed don't need them yet.
Now you should have the title screen you typed in earlier along with a request for input displayed. The input line is used to enter the commands for PAW to interpret into things to do, according to the information you have entered when writing your game. So far we have only told about it where to take us when a certain direction is entered, so try starting the game properly by typing [NORTH] (or whatever direction you used in the connection table entry for location 0) and pressing [ENTER]. (DELETE on the input line will allow you to correct any mistakes).
The screen will clear and the description for location 3 will appear - if it doesn't you probably have the entry in Connections wrong, don't worry you can go back to the editor by typing [QUIT]
(which is a command PAW knows to start with) and replying [Y]; you do want to quit and [N]; you don't want to try again. Use the connections table option to check and amend the entry as necessary.
You can now try moving between locations, testing the possible moves (make a note of any which are wrong so that you can correct them upon returning to the editor).
You might also like to try some of the other commands which PAW knows, e.g. R or REDESCRIBE will display the location description again - which is useful if a lot of text has been output and the
description lost. I or INVENTORY will list the 'objects' you are carrying, you will be carrying one object to start with but will be able to do nothing with it.
You are probably dying to see the parser in action by now (why not?) so if you work your way back to the bus stop and enter the following line you will get a flying visit round the game!
GO WEST THEN NORTH THEN SW THEN UP AND DOWN THEN SOUTH AND EAST THEN NORTH THEN EAST. INVENTORY
By the way [W.N.SW.U.D.S.E.N.E.I] will have the same effect but doesn't look half as impressive...
Right back to the boring bit, QUIT from the game as shown previously so that we can deal with the next chapter in this saga.
Objects
Objects are anything which the player can manipulate within the game, for example; An apple which they could eat, a key which they could use to unlock a door, or a rucksack to contain the key
and the apple!
In our simple game we will have the following objects (not all of which have a function in the final game).
Object 0 	A lit torch.
Object 1 	A bag.
Object 2 	A sandwich.
Object 3 	An apple.
Object 4 	A ticket.
Object 5 	A lead.
Object 6 	An anorak
Object 7 	An unlit torch.
Note that the torch is in fact two separate objects which we will swap over when the player turns it on and off.
Option O from the main menu as you might have guessed is used to enter the descriptions of the objects in a very similar way to how we entered our location descriptions, select the option by
typing [O]. You might not be surprised either to find that an object 0 already exists if you use option P to list them. Enter the above descriptions - remember to use [A 0] for the first one
as it already exists - perhaps using a different Ink colour, say Cyan (selected by [EXTENDED MODE] and holding down [CAPS SHIFT] while pressing key [5]). Don't forget to turn the colour back to
white (press [EXTENDED MODE] then [CAPS SHIFT] & [7]) at the end of each text.
Back to the main menu so that we can tell PAW all about our new objects. Option I allows us to define where each object will initially be when the adventure starts, so select the option and
the sub-menu to deal with initial position of objects will be displayed, similarly to connections there is no option to insert as this is done by PAW automatically when you insert an object.
Notice that Amend has two 'parameters' the object number and it's position and that this position has several special values (which are non existent locations); 252 is 'not-created', i.e. does not
yet exist within the game. 253 is used to 'contain' objects worn by the player, while objects carried by the player are contained in location 254.
For example we want to make the lit torch a 'not-created' object [it was 'carried' in the start database) so type [A 0 252] and the message "Amended" will be printed to show that PAW has
completed the task.
Objects
The remainder of the initial positions are as follows, so amend each in turn but don't try and type in the comments. Use option P to ensure the positions are correct when you finish.
Object 1  2 	;the bag starts off at the bus stop
Object 2  254 	;the player is carrying the sandwich
Object 3  254 	;and the apple
Object 4  8 	;the ticket is up the tree..
Object 5  3 	;the lead is on the grass.
Object 6  253 	;the player is wearing the anorak.
Object 7  254 	;and carrying the unlit torch.
Next we need to tell PAW some more about the objects, their relative weight, if they are capable of containing other objects and if the player can wear them! Type [Z] to return to the main
menu and select option X (xtra info??), by typing [X], this selects the object weight menu which also allows us to set the other two object 'attributes' (container/wearable). You may not
be surprised by now to find that PAW has created an entry in this table for all the objects inserted earlier. It in fact inserts an entry which makes all objects weigh 1 unit, not be a container
and not be wearable this is known as an objects' 'default' attributes. PAW allocates default values to everything even if that entry is 'null' (nothing).
You need to amend only the anorak and bag attributes as the player is able to 'wear' the anorak (in fact the is doing this when the game commences) and the bag will be able to 'contain'
other objects. In addition the bag and the anorak are 'heavier' relatively than the other objects and will have their default weight changed to 3 units each.
The A to amend an entry is followed by three values; the object number, the unit weight of that object and finally it's attribute options which are; 0-none, 1-a container for other objects, 2-the
player may wear (and remove) it and 3-a container which may be worn (and removed), (e.g. a pair of jeans which have a pocket). So for our bag (object number 1) which is a container weighing
three units we need to type [A 1 3 1] (not forgetting the spaces). The anorak has no pockets (well ours hasn't anyway!) but it can be worn/removed so the entry is [A 6 3 2]. Now use option P to examine the new entries which should be:-
Object 0 weighs 1
Object 1 weighs 3 C 	;C means a container
Object 2 weighs 1
Object 3 weighs 1
Object 4 weighs 1
Object 5 weighs 1
Object 6 weighs 3 WR 	;WR means Wear or Remove
Object 7 weighs 1
You might like to test the adventure again now to ensure that all the objects are where they should be, but note you will not be able to do anything with them yet, we still have to tell PAW what
word describes each object. (it may be a suitable time to do another save of the database now but ensure it is on a fresh section of tape and use the next filename number if you are numbering the versions.).
Vocabulary
This is a major table and to reflect this the menu is rather more complex than any you have met so far. Note that most of the text is merely reminding you of various options that are available and thus isn't really as complex as it looks at first.
The vocabulary is a list of all words that PAW is able to recognise in any input the player types in during the game. Thus any words which aren't in this table will have no effect at all!
Initially the vocabulary contains about 70 common English words which will be required for most adventures.
Each entry for a word consists of up to fice letters which will either be a complete word e.g. NORTH or the first five letters of a longer word e.g. ASCEN(D). a world value and a word type (e.g.
Noun, Verb etc).
The use of only five letters to store a word reduces the amount of memory required to store the entire vocabulary, the amount of typing the player must do and makes PAW faster at looking up
words when required. Five letters is also more than adequate to differentiate the majority of important words in the English language from each other.
The menu allows the insertion and deletion of words, the listing of entries for each word type and the inspection of 'synonyms' which we met earlier when we found out that PAW knew 'W' meant
the same as 'WEST'. Try [S WEST] (Show synonyms) to see indeed that PAW knows 'W' as well.
Now try [P 2] to look at all the Nouns that PAW knows to start with (the numbers which represent each word type are given on the right of the menu, type 2 are Nouns, type 0 are Verbs etc.).
You will find all the major compass directions, 'I' (which even though it is short for Inventory is a Noun.) and 'ALL' - plus their synonyms.
We need to increase the number of Nouns by inserting a word for each of our objects, now the first free number appears to be 15, but Noun values less than 50 have special meanings thus;
Nouns less that 50 are Proper Nouns, for example peoples names or places, but more specifically for PAW they are Nouns which will not affect the subject of 'it', take the sentence:-
GET THE SWORD AND CLEAN IT
It (a word known as a pronoun) refers to the SWORD obviously and PAW will (as long as SWORD is a Noun in the vocabulary with a value greater than 49) know this and assuming you have dealt with
the possibility of cleaning the sword, allow you to do so. But take the following sentence:-
GET THE SWORD AND KILL THE ORC WITH IT THEN DROP IT.
Normally PAW assumes 'it' to be the last used Noun but as long as ORC is a Noun in the vocabulary with a word value less than 50 then PAW will remember 'it' as being the sword and carry out the
action correctly. This feature is noted on the left of the menu along with mention of word values less than 20; these are Nouns which if PAW cannot find a Verb in a 'phrase' containing one,
will convert temporarily (i.e. it does not change the vocabulary) into a Verb. The major use of this is for things like NORTH which may be typed on their own implying GO NORTH which in normal
English is invalid but is common when playing adventures.
Finally words less than 14 are assumed to be movement words (any word which is a direction) and merely determine the message which will be printed if PAW cannot do anything with the phrase it has
found (i.e. it determines if "I can't" or "I can't go in that direction" is displayed). Note that this tag of 'less than 14 is a movement' applies to both Verbs and conversion Nouns.
Since all our objects are 'its' we must give them word values greater than 49 as follows:-
TORCH 		50
BAG 		51
SANDW(ICH) 	52
APPLE 		53
BUS 		54
TICKE(T) 	54
LEAD 		55
ANORA(K) 	56
note that there are two words with value 54, this makes BUS and TICKET synonymous so if the player types GET BUS TICKET or GET TICKET, PAW will know they mean the same thing.
Use the I option to insert these 8 words as Nouns (word type 2), for example TORCH is inserted by typing [I TORCH 50 2] and so on. Use [P 2] to check that the extra Nouns are now in the vocabulary when you have finished.
We also need some words to describe the difference between our two torches to PAW. The words which describe a Noun are called Adjectives, you can see which adjectives PAW knows already using
[P 3] (adjectives are word type 3), we need two extra adjectives LIT and UNLIT so insert these as word values 138 and 139 respectively using [I LIT 138 3] and [I UNLIT 139 3]. Note that
the adjective numbers start high as they are not used as often in sentences and it is pointless to search through them all the time when PAW mostly needs common Nouns or Verbs.
All word values from 2 to 254 are available for each type of word and there is no limitation on the number of words with the same word value (synonyms) so the vocabulary can become quite large if
you want.
Just to familiarise yourself with the other options, try inserting a word which is already present e.g. [I GET 20 0] will result in the message "GET is already present", deleting a word
which isn't present [D BANANA] (we don't have an banana in our game or the word in the vocabulary) will result in "BANANA is not present". Note that PAW takes only up to the first five letters
whenever you refer to a word and ignores the rest.
We will come back to the vocabulary fairly soon, but are going to tell PAW which words describe our objects first. We may have described what each object is and how much it weighs and even
where it starts in the game, but we haven't actually told PAW which word in its vocabulary refers to which object!
Return to the main menu now so that we can continue with yet another option.
Object Words
Option W is the table where the words in the vocabulary are linked to a particular object, again you can only Amend, Print or LPrint the entries in the table as PAW inserts a blank entry for
each object when you insert its description on the object text option. So [P] will reveal 8 blank entries for our objects.
The object word table allows both a Noun and an Adjective to be associated with each object number in the game. Our objects require the following entries:-
Object 0 TORCH LIT
Object 1 BAG _
Object 2 SANDW _
Object 3 APPLE _
Object 4 TICKE _
Object 5 LEAD _
Object 6 ANORA _
Object 7 TORCH UNLIT
This introduces a special word "_" (underscore of underline depending on your colonial bias) which means (in this case) no word ("_" is [SYMBOL SHIFT] & [0]). You must always type it in if
there is no adjective to describe the Noun. So for example lit torch and the bag are amended using [A TORCH LIT] and [A BAG _] respectively (they are in reverse order to simplify their use
within PAW). Amend these and the other objects entries now so that we can have a play again.
Play it again...?
This time we will examine the use of diagnostics, so from the main menu type [T] to select test game and [Y] to request diagnostics. The title and introduction will appear again along
with a request for input. The request for diagnostics has apparently had no effect, but if you now press [ENTER] before you type anything in you should find the cursor dissapear and a line
similar to:
Flag 38= 0 ?
appear in the bottom of the screen followed by a flashing cursor.
PAW contains 256 of what are known as 'flags', each flag can be used to contain a number from 0 to 255 and are used to indicate (or flag!) the state of some part of the game. e.g. You could
decide that flag 11 when set to 1 meant that the park gate was closed and when set to 0 meant it was open, we will see examples of the way flags can be set and used in the next section.
PAW has set aside several of the flags to indicate specific things (flags 0 to 10 and 29 to 59 actually). The value displayed on the bottom of the screen is the contents of flag 38 which PAW
knows is your current location (- in this case). To see this go back tot he input prompt by pressing [ENTER] (ENTER 'toggles' between diagnostics and input if you haven't typed anything else)
and move to the start of the game properly using [NORTH] (or whichever direction you used in the connections table for location 0). Again before typing anything on the new input line
press [ENTER] to get diagnostics and the line:
Flag 38= 2 ?
should be displayed, because you are now at location 2 (the bus stop). You can look at the values of other flags by typing their number before pressing ENTER, try [100 ENTER] to look at flag
100, which will display:
Flag 100= 0 ?
A very powerful feature allows you to set the value of a flag by putting = in front of the number, try [=10 ENTER] and the line should be redisplayed as:
Flag 100= 10 ?
Flag 100 does nothing in our game and its value is unimportant but if you decide to practice on your own do not change the values of any other flags for the moment or you may get some
funny effects if you happen on a flag which is important. Return to the input line when you have finished (press [ENTER]) so that we can see what else PAW can do.
We should now be able to manipulate the objects in the game, at the moment the bag will be at the bus stop with us, we will be carrying the sandwich, apple, unlit torch and wearing the anorak.
Use the diagnostics to look at the value in flag 1 ([ENTER 1 ENTER]) this has the value of 3, which is the number of objects carried but not worn, return to the input line and type
[GET BAG], PAW will print the message "I now have the bag.", which is known as auto-reporting (PAW automatically reports any action it has carried out). This command has caused the current
position of the bag to be changed from location 2 (the bus stop) to 'location' 254 (carried), note that no change has occurred to the initially at table in the database only to a copy which was
made when the game started. If you look at the value of flag 1 again (notice how the flag you looked at last is displayed when you reselect diagnostics) you should find it has been increased
to 4.
Now try [REMOVE ANORAK] and the report "I can't remove the anorak, my hands are full" will be printed. This is because PAW initially (by default in other words) allows the player to carry
only four objects at any one time, this logically must prevent the player from taking off clothing etc (actually removing is changing an objects position from location 254 to location 253!)
Try [DROP BAG] and then [REMOVE ANORAK] again, this time you should be able to do so. Look again at flag 1 and you should discover it is still four - this is because removing the anorak
has increased the number of things you have in your 'hands'.
Try the following and see if you can work out why they do what they do:
GET BAG
REMOVE ANORAK
WEAR ANORAK
GET APPLE
GET TICKET
Notice that all except the last report actually mentioned the objects by name, this is because they were in plain sight and thus the player would know they existed. But to a player who did
not know the game, the ticket has not yet been found and to mention it by name would imply that it existed or that there was only one in the whole game thus giving a clue!
If you try and put anything in the bag you will find that PAW drops that objects instead. This is because we haven't yet told PAW what can be put in the bag only that the bag is a container,
the next chapter deals with this subject.
Finally we will find a 'bug' in our game; type [GET GATE] which will result in "There isn't one of those here". It shouldn't say that because the description says there is a gate here!
The problem arises because although we told PAW about the apple the sandwich, the torch and so on, we didn't tell it about the gate, if you use GET (or DROP,WEAR and REMOVE) with any word
which is not in the vocabulary then PAW assumes it is an object which is 'not here'. Of course once the word is in the vocabulary, PAW will know it isn't an object (if there is no
entry for the word in the object word table) and report "I can't do that." which is correct.
So go back to the editor main menu ([QUIT ENTER Y ENTER N ENTER]) and select the vocabulary option [V]. The extra Nouns we require are as follows:
GATE 57
RAILI(NGS) 58
GRASS 59
PATH 60
BENCH 61
POND 62
BANDS(TAND) 63
IRON 63
TREE 64
BRANC(H) 64
LEAF 64
Notice how all the ways the player can refer to the tree are catered for, we have no intention of allowing the manipulation of leaves or the branch, but if you did you would need to give them
separate word values - this is an important design consideration.
You might like to test the game again to ensure that GET GATE does indeed produce the correct response.
We have now dealt with; creating locations and connecting them together, creating and describing objects, assigning them a word from the vocabulary, a starting point in the game, a relative
weight, flagging if they are wearable (and removable) and if they are a container. The next chapter goes on to create problems and characters to make the game world a more interesting place by
allowing the player to do things!
Process & Response
We now come to the section of PAW which allows the problems and characters in the game to be created.
The Response table
The response table is option R on the main menu and is a special form of what PAW terms a process table. A process table can be thought of as a simple sequential (it does each command in turn)
programming language, the commands which are carried out are called 'CondActs' because they can be divided mainly into two groups; Conditions and Actions.
Earlier we mentioned that the parser in PAW breaks sentences down into phrases, which are then organised into what is known as a LS (logical sentence). In the case of directions like NORTH (which
sare LS's on their own) it uses the connections table to discover where (if at all) it should move the player to. Before it does that however it carries out a check against the response table to
see if that table contains an entry which can deal with the LS, i.e. give a response to part of/entire command the player originally typed.
Every possible phrase the player types and therefore every LS that your game will respond to, will have a corresponding entry in the response table, except for most movements which you set in
the connections table.
The most important part of a LS is the Verb, this shows the purpose of the LS, next most important is the first Noun whic shows the subject of the LS; e.g. GET APPLE, GET is the purpose
and APPLE is the subject.
If you now select the response table option from the main menu by typing [R] you will be presented with the sub-menu to deal with this table.
Type [P] to look at the table. For the moment ignore the other entries and consider the first entry only:
I _ INVEN
the two words indicate the Verb and Noun respectively of the LS that this entry can deal with. Now I is a conversion noun (as we saw in the section on vocabulary) which means if it is the only
word the player types in a phrase, it will become the Verb for the LS. The underline (_) indicates that the Noun is not important in this entry - a bit like a 'no word' in the object
word table. What this means in simple terms is that if the player types I on its own PAW will match it up with the first entry in the response table and carry out that entry as described next.
Process & Response
In order to carry out the entry, PAW will execute each of the condacts (commands) in the list which follows. Now the first entry contains only one condact;
INVEN is an action (the act part of the word condact!). It is an action because is carries out the act of listing the objects the player is carrying and wearing on the screen, you do not need to
worry how INVEN does this it just does.
When you typed I (or INVENTORY which is synonymous remember) during testing the game, it was this entry in response that caused something to happen because a logical sentence of "I _"
was created by the parser, which PAW then found matched the first entry in the response table.
INVEN once it has listed any objects you are carrying, instructs PAW it has 'done' something, when PAW discovers this is asks the parser for another LS, which the parser provides by decoding the
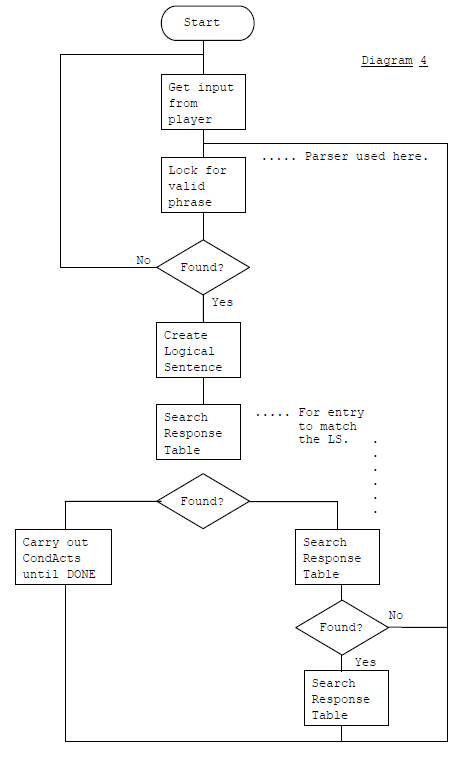
next phrase int he players input, PAW gets this LS and checks it against the entries in response and so on. this 'loop' is shown in diagram 4 in the form of a flowchart which you should follow
from the box marked 'start'. The loop is slightly more complex than the diagram might lead you to believe and a complete one is given in the technical guide, but diagram 4 will do for now.
We advise you reread the above paragraphs and study the diagram until you are happy with the way PAW operates on LS's before proceeding.
Let's consider the second entry in response:
GET I INVEN
as you might have worked out this entry deals with the phrase TAKE INVENTORY (GET is a synonym of TAKE, I is a synonym of INVENTORY and PAW always prints the shortest synonym) this deals
with another way the player might request a list of the objects he has with him.
We will skip the next few entreis (you will have to press a key - except for BREAK, SPACE of N - to get the next screen full of text at this point) and move onto:
QUIT _ QUIT
TURNS
END
Now, QUIT is a Verb in the vocabulary, so, as the minimum valid phrase is a Verb, if QUIT is typed on its own by the player then the parser will generate a LS of "QUIT _", on searching through
the response table PAW will find the above entry and start to carry out the condacts which follow;
QUIT is a condition, (the cond part of the word condact), do not confuse the Verb QUIT in the vocabulary with the condition QUIT, if you were to make STOP a synonym of QUIT and then delete the
qord QUIT from the vocabulary then the player would have to type STOP to end the game, but the condition QUIT would still be carried out i.e. the entry would then read:
STOP _ 	QUIT
		TURNS
		END
A condition merely decides if PAW should carry out the next condact in the list. QUIT determines if the next condact should be carried out by asking the player "Are you sure?". If they
reply "NO" then QUIT tells PAW it has 'done' something which causes PAW to go and get another LS (i.e. it stops the QUIT) this is slightly different to the normal way a condition works as you
will see later. If the player types "YES" then QUIT does nothing and allows PAW to look at the next condact in sequence which is TURNS.
TURNS is an action, which prints "You have taken x turn(s)." on the screen where x is the number of phrases that PAW has carried out since the player started the game. Despite the fact it has
done something it does not tell PAW to stop looking at condacts which proceeds to look at the next condact END.
END is a special action, which prints "Would you like another go?" on the screen. If the player types "YES" then END will cause the game to be restarted with all objects restored to their
required position and so on. Otherwise END causes an "OK" error to be generated which will return you to the editor menu of PAW. If the editor menu of PAW isn't present (i.e. a finished game)
then the computer will reset.
Note that you should always have an END action somewhere in the game (if you should happen to remove the QUIT entry that is) or you may not be able to return to the editor section very easily -
you would have to use the BREAK key which only works while PAW is processing, and as you found out earlier PAW is so fast that catching it doing something isn't that easy!
The other entries which are present int he database deal with a number of other standard commands which the player of an adventure will usually need. The condacts used in the other
entries are discussed below. You may be wondering why these entries are in the table and not part of PAW if they are needed in every game. Well apart from the fact it is easier to make them
a table entry, your game might not need them and as they are a table entry they can be deleted.
DESC is an action, used by the "R _" entry int he table which causes PAW to abandon scanning the response table and reDESCribe the current location of the player.
SAVE and LOAD are two actions which allow the current state of the game to be saved and reloaded from tape, the current game position includes every piece of information needed to restore the game after a LOAD to exactly the same position it was before the SAVE and includes the values of flags, position of objects plus sundry other information. Again do not confuse the Verbs SAVE and LOAD in vocabulary with the actions SAVE and LOAD. You could equally as well use STORE and RECAL(L) as your vocabulary Verbs but they would still use the SAVE and LOAD actions in the
response table. Note that both SAVE and LOAD effectively do a DESC action when they have finished which means any condacts which follow will be ignored and that they also cause any further
phrases in a players input to be ignored.
RAMSAVE and RAMLOAD are two actions similar to SAVE and LOAD, except that they use a 'buffer' (area of free memory) to store the game position, this means that there is no need for the player to fiddle about with tapes. Only one position can be stored and as it is stored in memory it will be lost if the computer is turned off, this should be made clear to the player.
Note that the buffer area is lost when you return to the editor section of PAW because you might change the design of the game in between two tests! The number after RAMLOAD is a parameter and
tells the condact how many of the flags to restore from the previous RAMSAVE, this allows scores etc to be maintained even if the player 'cheats' by using RAMSAVE and RAMLOAD in a difficult
part of the game. They are both followed by a DESC action as unlike SAVE and LOAD they just continue onto the next condact.
If PAW runs out of condacts in a list without being told it has DONE something it will 'drop off' the end and realizing this will continue to search response for another matching LS. We also said
that QUIT was a bit different to normal conditions, well for a start it is the only condition which asks the player for information and secondly it tells PAW something has been done if
the player replies "NO" (they don't want to abandon the game) which causes PAW to get a new LS. A normal condition if it 'failed' would merely cause PAW to continue searching the
response table for another entry matching the LS.
The other condacts which are used will be considered now in relation to the entries they are part of. To simplify our explanation we can consider the position of an object to be one of four places;
HERE: The current location of the player (the value stored in flag 38 if you remember).
CARRIED: 'location' 254, the imaginary location which is where all objects the player is carrying are stored.
WORN: 'location' 253, the imaginary location which is where all objects the player is wearing are stored.
NOTHERE: Anywhere else! This may also include 'location' 252 which is the imaginary location where any objects which do not yet 'exist' within the game are stored.
Take the following two entries in the response table:
GET  ALL  DOALL  255
GET  _    AUTOG
	  DONE
these two entries allow the player to GET an object. GETting an object involves changing its location from HERE to CARRIED.
Ignoring the GET ALL for a moment let us look at the GET _ entry, as we said earlier underline means 'any word' so no matter what Noun the player types in, in the phrase containing the GET the
GET _ entry will match (this is called triggering the entry). Take the phrase GET THE APPLE; THE will be ignored because it is now in PAW's vocabulary, so the LS will be "GET APPLE", this will
'trigger' the GET _ entry resulting in PAW looking at condact;
AUTOG is an action which AUTOmatically Gets the object specified by the Noun. This is where the object word table comes into effect, AUTOG looks through the object work table for an entry
which matches the Noun in the LS, when it finds one (APPLE in the example) it then knows the number of the object it refers to (the apple is object 3), it then ensures that the current location of
that object number is HERE and if so changes it to CARRIED and prints the message "I now have the _." when the underline is replaced with the description of the current object. i.e. the one
AUTOG just looked up. If it does not succeed in finding an entry then there are five possibilities;
1/ The player has tried to get an object which they are already carrying or wearing in which case "I already have the _." is displayed.
2/ The player has tried to get an object which is NOTHERE in which case "There isn't one of those here." is displayed.
3/ The player has tried to get something which is not an object but does have a word in the vocabulary (e.g. GATE in the demo game) this results in "I can't do that.".
4/ The player has used a word which is not in the vocabulary which cause the parser to create a LS of "GET _" which triggers our GET _ entry anyway. AUTOG assumes this to be a Noun describing an object (which may or may not exist) and displays "There isn't one of those here.".
5/ The player is unable to carry any more objects or this object would cause the weight limit to be exceeded in which case a suitable message is displayed.
If AUGOG succeeds then PAW looks at the next condact DONE;
DONE merely tells PAW that this entry is finished and it should go and get another LS.
Next we will look at the GET ALL entry, you may have guessed what this does (it attempts to GET all objects at the current location), so we shall explain the mechanism;
Should the player type the phrase GET ALL, the parser will create a logical sentence of "GET ALL", which will match the entry and cause PAW to look at the DOALL section;
DOALL is an action which is followed by a parameter which gives a location number to use. DOALL looks through the current location list for each object looking for entries that are at the same
location as the parameter (which in this case is 255, a special location which means that the current location of the player should be used instead), when it finds one it looks in the
object word table to find the vocabulary word which describes that object number, this is placed in the current LS (thus replacing the Noun ALL), a flag is set to indicate that DOALL is
active and the rest of the response is scanned by PAW for an entry which matches the newly modified LS. This will be the GET _ entry discussed earlier, which will GET that object. Once this
has been done PAW will discover that DOALL is active and go back to the GET ALL entry (actually it goes direct to the DOALL action) and allows DOALL to look for another object which
generates a new LS and so on for all objects at the specified location. When DOALL runs out of objects it resets the flag to show it is not active and tells PAW to get a new LS.
This may seem a rather roundabout way to approach this task, but
if you examine the very similar DROP,WEAR and REMOVE entries you
will see that the same mechanism is used to create all four
commands. AUTOD, AUTOW and AUTOR work in a very similar way to
AUTOG while DOALL merely uses location; 254 (CARRIED) as the
parameter for DROP and WEAR (i.e. DOALL searches all the CARRIED
objects when you try to DROP or WEAR ALL!) and 253 (WORN) when
you try to REMOVE ALL.
If the above seemed a bit heavy going don't worry about it for
now as DOALL is one of the two most complex condacts in PAW and
hopefully the penny will drop as we continue. At this point you
might like to use the test adventure option and try out the 'all'
commands which may make the mechanism clearer.
Messages
Before we continue with the response table we will insert some
entries in another table which will be needed. So return to the
main menu and select option M for messages.
Messages should be a breath of fresh air after that discussion of
the response table, the sub-menu provides options very similar to
the location and object description menus, the purpose of
messages is to contain all the text which will be displayed to
describe what is happening in the game to the player, excluding
the messages that PAW itself displays (like "I can't do that."
etc). If you use option P you shouldn't be surprised to discover
that an entry already exists.
We are going to deal with the player wanting to examine things in
the game, e.g. EXAMINE APPLE. Now examining an object merely
requires the writer to provide a message which gives more
information about the specified object, so in the case of the
apple we could say "The apple is crisp and green.". Change the
text of the message 0 to read that ([A 0 ENTER]), and then insert
the following messages to deal with some of the other things in
the game;
Message 1
It's a cheese and pickle sandwich.

Message 2
The ticket has "City Bus Company" printed on it.

Message 3
The bench is firmly screwed to a concrete base.
We are goin got deal with only four items in the demo game but in
a large game you would usually provide detail for most things,
even if they serve no purpose it provides a touch of realism
which always makes the player feel involved.
So back to the response table (option R from the main menu) and
start work. Let's take the apple first; the phrase which the
player will type will be EXAMINE THE APPLE (or EXAMI APPLE if
they are lazy!) producing a LS of "EXAMI APPLE". So we need to
insert an entry with these two words.
First type [I EXAMINE APPLE ENTER], PAW will ignore the extra
letters and print the entry at the top of a clear screen and wait
for you to type in the list of condacts for that entry. Now we
must only allow th player to examine the apple if it is actually
HERE, CARRIED or WORN (most normal people have a distinct
disability at looking round corners or through walls!), this is
collectively known as present and can be checked for using the
condition PRESENT followed by the number of the object we are
considering (the apple is object 3). If the object is indeed
present then we can display our message (0) which describes the
object, using the action MESSAGE which is followed by the number
of the message you want to display. Finally we top it off with a
DONE action to tell PAW that we have completed the task.
So type [PRESENT 3 MESSAGE 0 DONE ENTER] which will result in the
message "Inserted." being displayed by PAW. Now press a key to
get back to the sub menu and use [P EXAMINE] to examine our new
entry (the brackets about the parameters show they are optional,
so you can use P to see the table from the start, P followed by a
Verb to see entries from that Verb on, or P followed by a Verb
and Noun to see all entries from that Verb and Noun on). The
entry should look like;
LOOK 	APPLE 	PRESENT 3
		MESSAGE 0
		DONE
PAW has found the synonym LOOK and printed it because it is
shorter than EXAMI(NE). This is a classic example of a response
table entry because if the condition PRESENT 3 fails then PAW
will continue to look for an entry to match the LS, in this case
it will find the next entry displayed which is LOOK _, this entry
will trigger and describe the current location (the DESC action),
after the PLUS action has added 128 to flag 29, which causes PAW
to redraw any picture at the location as well as display its
description this will be covered in more detail in the section on
graphics. Assuming that the APPLE is indeed present then PAW will
continue with the condacts and display our description of the
apple (MESSAGE 0) the DONE action tells PAW to go and get another
LS because we have done something - this prevents the LOOK _
entry triggering as well.
If the entry should be incorrect you can amend it by typing A
LOOK APPLE, with process tables however there may be more than
one entry with the same word values, these will be presented in
turn for possible amending - just press ENTER to leave an entry
as it is. To delete an entry entirely from the table remove all
its condacts. i.e. Amend the entry and press EDIT twice to clear
the buffer and then press ENTER.
So at the moment if the player tries to EXAMINE anything except
the apple (or tries to EXAMINE APPLE when it isn't rpesent) they
will be rewarded with a fresh description of their current
location. Let's insert the entries to deal with the sandwich,
ticket and bench - the entries are listed as you would see them
if you used P after they are typed in, along with some comments
for your reference only, you must still enter them as you did the
EXAMINE APPLE entry earlier.
LOOK SANDW 	PRESENT 2 ; The sandwich is here
			MESSAGE 1 ;Describe it
			DONE

LOOK TICKE 	PRESENT 4 ;The ticket is here
			MESSAGE 2
			DONE

LOOK BENCH 	AT 	4 ;The bench isn't an object
			MESSAGE 3 ;so check location
			DONE
AT is a condition which is followed by a location number which
will succeed (i.e. allow PAW to continue onto the next condact)
if the player is at the same location, this was used because the
bench was not an object, but as it is part of the description for
location 4 it will always be there!
Use test adventure to check that you can examine these four items
correctly and that the location is described at any other time.
The Process Tables
We shall now turn our attention to the most powerful writing
option on the main menu; the Process table.
It was stated earlier that the response table was a special form
of process table, and indeed it is, if you select option P from
the main menu you will be presented with a similar sub-menu to
that for the response except it has two extra options. Note that
the title says "Process 2", this is because there is more than
one process table in PAW, indeed there can be upto 254 process
tables as we shall see.
There are two process tables in the database to start with, just
like response PAW scans through them, but, unlike response, it
scans them not after obtaining a LS, but;
Process 1 is scanned immediately after PAW has described a location. This allows information to be printed only once when the player first arrives at a location or
when he requests a redescribe.
Process 2 just before requesting a new LS from the parser. This
is used to provide PAWs 'turn' at the game.
The main difference being that it does not attempt to match the
LS against each entry looking for a match, it does every single
one!
So far while playing our demo game we have had to end the game by
typing QUIT. Now the original storyline (if you can remember that
far back!) was to help the passenger fidn the ticket before the
bus arrived. Now we obviously could have an entry in response
which if the player said GET TICKET (and it was present) could
trigger the end of game e.g.
GET TICKE 	PRESENT 4 ;The ticket is here
		TURNS
		END ;That's all folks!
but wouldn't it be much better to finish the game when the player
gets back to the bus stop?
We shall do so, ut, first we need a message to describe the
arrival of the bus, so return to the main menu and select
messages (option M) and insert the following message;
Message 4
The bus arrives. I hand the ticket to the driver who
smiles and says "Sorry I'm late, hope you haven't been
standing too long?".
Back we go to the Process menu. Now although the words have no
meaning to PAW they can usefully be used as a comment on what the
entry does "_ BUS" (we must start with _ as PAW only allows the
NOUN BUS in the Noun position). So type [I _ BUS ENTER] to insert
the entry (PAW has actually inserted a null entry now and if you
press [CURSOR DOWN CURSOR DOWN] to abandon the entry, you will
have to [A _ BUS ENTER] to complete the entry). The conditions
for the end of the game are that the player is at the bus stop
(location 2) and is carrying the ticket (object 4). The first
condition of course will be AT 2, the other can be checked with
CARRIED 4 (pretty unusual names these conditions have...) so the
final entry will be;
AT 2 CARRIED 4 MESSAGE 4 TURNS END
pressing [ENTER] will complete the insert/amend. Use [P] to
ensure the entry looks as follows;
_ 	BUS 	AT 	2
		CARRIED 4
		MESSAGE 4
		TURNS
		END
this entry will now be scanned just before PAW gets a new LS and
as soon as both conditions are met the game will end independent
of the commands the player uses to get to the bus stop with the
ticket!
Select process 1 by typing [S 1 ENTER] and use [P] to examine the entries that are present, they are;
*	_	NEWLINE
		ZERO 0
		ABSENT 0
		LISTOBJ
*	_	PRESENT 0
		LISTOBJ
The asterisk '*' is an 'any-word' word like '_' with a subtle
difference; Whenever PAW inserts entries in a process table
(including response) it inserts them in order of word value of
the Verb and then the Noin (i.e. all entries dealing with one
type of Verb will follow each other in ascending order of Noun
value). PAW considers underline "_" to be a word of value 255 (it
will always be the last entry) and asterisk "*" to be a word of
value 1 (it will always be the first entry). The position of
entries in process tables can be important for example the two
entries shown must always be done soon after a location
description has been printed so we use an asterisk to ensure they
will be close to the start of the table (the use of underline as
the Noun allows entries to be inserted before them as we will do
in a moment).
Back to why these two entries are present (always getting
sidetracked, so much to tell!). Because PAW does every entry in
Process 1 and 2 (you might spot that it would do anyway even if
not forced to as the * _ entries would match any LS the player
typed!) the first action NEWLINE will always be executed;
NEWLINE prints spaces to the end of the current line as opposed
to just starting a newline as CHR$(13) does on a Spectrum. This
allows areas of Paper colour to continue to the end of the line
without having to type the spaces. It's main purpose here is to
ensure that any text displayed will be on a new line because PAW
does not start one at the end of displaying a location
description, the technical guide shows how to use this to good
effect to modify the location description to reflect changes in
the location.
From now on the two entries must be considered as a pair, their
ultimate purpose is to list the objects at the current location,
first a bit of background information.
PAW uses flag zero to determine if there is light for the player
to see by (this feature is not used at the moment in our demo
game), if there is no light the flag will have a value other than
zero and PAW will say "It's too dark to see anything." instead of
the description for the location. In this case the objects that
are present must not be listed.
Object 0 is assumed by PAW to be an object which provides light which is why object 0 in our demo is a lit torch. If this is
present while the game is 'dark' (flag 0 in non zero) then it
will override the darkness and so the objects must be described.
The two entries provide an example of using PAW to create an OR
situation i.e. List the objects if it is light OR if object zero
is present;
ZERO is the first condition we have met which tests the state of
a flag. ZERO 0 will succeed if flag zero contains 0 which means
there if light.
ABSENT ensures that Object 0 is not present (opposite of PRESENT
condition - all conditions have an opposite, e.g. AT has an
opposite of NOTAT and so on.), the next * _ entry lists the
objects if object 0 (the source of light) is present so we do not
want this entry to succeed as well (i.e. This deals with the
situation of it being light and object 0 being present which
would otherwise list the objects twice!).
LISTOBJ lists any objects that are present at the players current
location, if none are present it does nothing - it would look a
bit silly saying "I can also see nothing."!
Think about the above as it represents a fairly useful feature of
PAW which you may well need to adapt for use in your own games.
Right, now we shall reveal the better way of getting from the
introduction screen to the start of the game at the bus stop:
*	*	AT 0
		ANYKEY
		GOTO 2
		DESC
Insert this in to Process 1 (ensure you still have it selected)
using [I * * ENTER] and [AT 0 ANYKEY GOTO 2 DESC]. This uses two
new condacts ANYKEY and GOTO which are both actions;
ANYKEY prints "Press any key to continue." in the bottom section
of the screen and waits for you to press a key, it then allows
PAW to continue onto the next condact.
GOTO is followed by a location number and moves the player to
that location, it effectively sets flag 38 (players current
location) to the value given, it does nothing else so it is
followed by a DESCribe to get PAW to display the new description.
This entry thus causes the title screen to be displayed (when PAW
displays the first location description), a wait for a key and
then the game itself is started at the correct location.
You might like to go to the connections table and remove the entry for NORTH in location 0 as this is not needed now.
Use test game to see the above two entries in action. The
following input while at location 2 (the bus stop) will 'solve'
the game in one go:
GO WEST, WEST AND UP. GET THE TICKET. GO DOWN,EAST AND EAST.
You should then get the finishing message and an option to play
again. If not check the entries in Process tables 1 and 2
thoroughly.
Let's have a break and go back to deal with the ability of the
bag to contain objects. Thought we had forgotten about that,
didn't you? Well we nearly did. This will require some entries in
the response table and we are going to allow the player to LOOK
IN BAG, so we need a new message "In the bag in:", select the
messages option and insert this (it should be message 5) then
select the response table. We are going to provide the player
with the option of saying PUT ALL IN BAG as well as PUT object IN
BAG. We can use exactly the same system as GET/DROP ALL discussed
earlier. PUT is a synonym of DROP (which takes care of DROP
TICKET IN BAG and such similar phrases), so the LS we must check
for will be PUT _ (i.e. player is trying to put or drop
something), now if the player includes IN BAG as part of the
phrase we want PAW to put the object in the BAG. This means we
must override the PUT _ entry already present, and if the extra
words are included in the LS put the specified object in the bag.
To insert this entry before the one already present requires the
use of an extra option. Normally PAW would insert another entry
with the same word values after any already present, it is
possible to force this by specifying a number after the insert,
try [I PUT _ 0 ENTER], this instructs PAW to place the entry
before entry number 1 (which is the existing PUT _ entry). Now
the condacts we need are:
PREP IN NOUN2 BAG PRESENT 1 AUTOP 1 DONE
This shows how we check for an extended LS (i.e. ensuring certain
parts of the phrase were what we need).
PREP is a condition which is followed by a preposition from the
vocabulary. Prepositions are words used before a Noun to show its
relation to another word in the phrase, in this case the
condition will succeed if the player has used IN as part of the
phrase.
NOUN2 is a condition which is followed by a Noun from the
vocabulary. This will succeed if the player has used BAG in the
phrase. Combined with the previous entry it effectively stops PAW
looking at the condacts unless the LS was PUT _ IN BAG where the
underline is any object.
AUTOP is followed by a location number. Now we set aside location
1 for a special purpose early on in the tutorial, this is it, it
is used as the inside of the bag! SO AUTOP just like AUTOD scans
the object word table for a Noun which matches the current first
Noun in the LS, when it has found one it places it at the
location given, reporting "I have put the _ in the bag."!
The DROP ALL entry which exists will also work to deal with PUT
ALL IN BAG, because it does not ensure that IN BAG is part of the
LS and will trigger on both occasions, and in both cases 254 is
the location the objects will be coming from.
Now for a GET object OUT OF BAG type command we need an entry
similar to the above to override the GET _ entry which is present
so insert the following using [I GET _ 0 ENTER]:
PREP OUT NOUN2 BAG PRESENT 1 AUTOT 1 DONE
AUTOT is followed by a location number which shows where the
object to TAKEOUT will come from.
The implementation of an ALL version of the commands needs an
entry of its own, at the moment GET ALL causes a DOALL 255 which
is the current position of the player to be carried out, in order
to get all from the bag we need to generate all the objects that
are inside it (location 1), so insert a GET ALL entry to override
the existing one thus; [I GET ALL 0 ENTER]:
PREP OUT NOUN2 BAG DOALL 1
Before you test the game we will insert the entry that allows the
player to LOOK IN THE BAG the entry needed is as followed (note
it will be positioned in a suitable place anyway so there is no
need to specify a number after it when inserting).
LOOK	BAG	PREP	IN
		MESSAGE 5
		LISTAT 1
		DONE
LISTAT is followed by a location number and lists any objects
present at that location, note that if no objects are present it
will print "nothing." so the above would result in:
In the bag is:
nothing.
which is correct, unlike LISTOBJ which because of its main use
does not print anything at all in that situation.
So use test adventure to ensure that you can indeed PUT ALL IN
BAG and GET object OUT OF BAG etc.
The Bird
The tutorial game is a little bit simple to solve so we shall add
some complexity in the form of puzzles by creating two characters
to wander round our little world. These are termed 'Pseudo-
Intelligences' (PSIs for short) because they cannot obviously
think, but must appear to do so to the player. A PSI consists
mainly of a collection of messages, flags and process table
entries, but even a few simple entries can create a surprisingly
realistic effect. Creating a complex PSI of say a human can take
a fair bit of thought, but follows the same principles as we will
take with our two PSIs; a bird and a dog.
The bird will complicate the scenario as follows; The bird will
have the ticket at the start of the game (normally you would
assign an unused location to contain the birds objects, but we
will use location 252 - object does not exist in game - as we
have only one PSI that can have an object). This means you must
persuade the bird to drop the ticket, trying to GET it will
result in an "I can't do that" message and the bird flying away.
The bird also flies between the Bandstand and the Tree Branch at
regular intervals. The way to get the bird to drop the ticket
will be to drop the sandwich at the same location. So lets get
that little lot working first.
To save flicking back and forth between tables change Object 4 to
be not-created using [I] Initially at now. This makes the ticket
a does not exist object which we are using to indicate it is in
the birds beak. Insert the Nouns DOG and BIRD in the vocabulary
with word values 21 and 22 respectively - ensure DOG is 21 and
BIRD is 22 as their word values will be used to position the
entries in process correctly. Then insert the following messages
which will be needed. Make them use green ink (EXTENDED MODE,
CAPS SHIFT & 4) - not forgetting to reset ink white (EXTENDED
MODE, CAPS SHIFT & 7) at the end of each one.
Message 6
The bird drops the ticket to peck at the sandwich.
Message 7
The bird snatches the ticket.
Message 8
The bird ignores me.
Message 9
A small bird is here.
Message 10
The bird has a ticket in its beak.
Message 11
A small bird settles on the ground.
Message 12
A small bird lands on the branch.
Message 13
The bird sees the dog and flutters away quickly.
Message 14
The bird flies away.
We will insert the messages to deal with the dog later. So select
the Process tables option and get ready for an ear bending on yet
another feature of PAW.
In a large game which contains several PSIs and a lot of
background action, Process tables 1 and 2 soon become so full of
entries it is nigh on impossible to work out what they do. Enter
stage left the other process tables to the rescue, these can be
'called' from Process 1,2 or Response and used as an extension of
the table they are called from. Calling a process causes PAW to
save where it is at the moment and shift the action to the
indicated table. i.e. if called from Response PAW will try and
match the LS against each entry and if called from Process 1 or 2
PAW will do each entry. Note that when something is DONE in the
called process, then PAW will still shift back to the original
table, so some very powerful things can be achieved with
thoughtful use of these sub-process'. Users who program in other
languages will recognise this as a 'subroutine'.
While PAW is in a sub-process it is quite possible for it to be
asked to call yet another sub-process - a sub-sub-process? and so
on down to a sub-sub-sub-sub-sub-sub-sub-sub-sub-sub-process!
called 'nesting' a call, attempts to go further will result in an
error "Limit Reached" although you will be provided with
diagnostic information as well is you are testing the game from
the PAW's editor section - see technical guide for details.
We are not going to use anything like that here, only a sedate
sub-process. This will contain all the entries to deal with teh
birds activities.
Use [B] to begin a new process table, PAW will allocate the next
available number as in other menu options. You should be starting
process 3. As there will only be a few entries in the table we
will use the same word pair ("_ BIRD") although when writing your
own games you may find using other words useful to remind you of
each entries function.
Flag 11 will be a 'working' flag to contain a value for use in a
comparison.
Flag 12 will contain the current location number of the bird.
Flag 5 is a special flag which if it has a value other than zero
PAW will reduce by one whenever is scans process 2 - this is
called an auto decrement flag. In this case it is user to count
the number of 'time frames' that have passed in the game, a time
frame is a single time round the big loop shown in diagram 4, and
at the moment this is done before every phrase the player types.
The bird will change location every three phrases on behalf of
the player which will create the appearance of action in the game
independent of the players input.
Now insert the following entries, without the comments as before
each entry is preceded by an explanation of its purpose and any
new condacts it uses:
First determine if the bird is going to fly away this time
through the table, this is indicated by flag five beign zero (as
it counts down from 3), if the ticket is at the same location as
the bird it will be destroyed (i.e. put at location 252 so the
bird 'has' it) and if the player is at the same location as the
bird they will be told that the bird has snatched the ticket.
Note that the bird will continue its cycle of movement even if
the player does not see it, a tree certainly does fall even if
there is no one to see it in PAW!
_	BIRD	COPYOF	4	11 	;Copy location of object 4
					(ticket) to flag 11.
		SAME	11	12	;and see if it is at the
					same location as the bird.
		ZERO 	5 		;Bird going to fly?
		DESTROY	4		;Bird 'GETS' the ticket
		SAME 	12	38 	;Bird at same location as
					;player?
		MESSAGE	7		;Tell player about it.
Note these is no DONE action as we want PAW to do each entry in
turn, the above entry shows how conditions and actions can be
mixed together to create new conditions.
COPYOF is an action followed by an object number and a flag, it
copies the current location of the specified object to the
specified flag. We use it in this situation to see if the ticket is at the same location as the bird by following it with;
SAME is a condition which compares the contents of the two flags
and succeeds if they are the same.
DESTROY is an action which places the specified object at
location 252, the not-created location.
Now deal with the two possible movements of the bird. If the bird
is at the bandstand and flag five has reached zero then move the
bird, set flag 5 to 3 again and tell the player the bird is gone
if they were at the same location. Vice Versa if the bird is on
the branch.
_	BIRD	EQ	12	8	;Bird on branch?
		ZERO	5 		;Time to fly?
		LET	12	5	;Move bird to bandstand
		LET	5	3	;Three phrases 'till move
		AT	8		;Player here as well?
		MESSAGE	14		;tell them bird has flown

_ 	BIRD	EQ	12	5	;Bird on bandstand
		ZERO	5		;Time to fly?
		LET	12	8	;Move to branch
		LET	5	3	;Three phrases 'till move
		AT	5		;Player here as well?
		MESSAGE	14		;tell them...
EQ is a condition which is followed by a flag number and a value
and will succeed if the flag contains the value, in this case it
is checking if the bird is at a specified location.
LET is an action which is followed by a flag and a value. It sets
the flag to the value.
Now we have dealt with the birds departure, next we must deal
with its arrival, and if it arrives in a location which contains
the player tell them about it.
_	BIRD	EQ	5	3	;Bird just flown?
		SAME	12	38	;Now at players location?
		AT	5		;On bandstand?
		MESSAGE	11		;landed on ground

_	BIRD	EQ	5	3	;Bird just flown?
		SAME	12	38	;Now at players location?
		AT	8		;On branch?
		MESSAGE	12		;landed on branch
Now if the bird has the ticket in its beak we must tell the player.
_	BIRD	EQ	5	3
		SAME	12	38
		ISAT	4	252	;Ticket not-created?
		MESSAGE	10		;Has a ticket in beak..
ISAT is a condition followed by an object and a location number
and succeeds if the object is at the specified location.
Finally is the sandwich is at the same location as the bird the
bird will drop the ticket to peck at the sandwich. This entry
does not rely on flag 5 so it will be checked for every time PAW
checks process 2, so even if the player drops the sandwich after
the bird has arrived the correct sequence will still be carried
out.
_	BIRD	COPYOF	2	11	;Sandwich
		SAME	11	12	;at same location as bird?
		ISAT	4	252	;Ticket in beak?
		COPYFO	12	4	;Put ticket down
		SAME	12	38	;Player here as well?
		MESSAGE	6		;tell them...
COPYFO is an action which copies the contents of the specified
flag to the current location of the specified object. There are
also COPYFF and COPYOO actions which you can probably guess the
purpose of.
That completes the control routine for the bird, but we need an
entry in Process 2 to call this table every time frame, so select
Process table 2 and insert an entry:
_ BIRD PROCESS 3
which will cause PAW to execute our bird control table every pass
round its main loop.
We must ensure the bird starts at the correct location and that
the player knows the bird is there when the location is described
(or they will see messages about a bird arriving and flying off,
with the description containing no mention of it). So select
Process 1 which is called after a location is described and amend
the existing * * entry we made earlier to contain a LET 12 8,
which will ensure the bird is on the branch at the start of the
game. The modified entry should read thus:
*	*	AT	0
		ANYKEY
		LET	12	8	;Bird is on branch (locno. 8)
		GOTO 2
		DESC
Insert the following entry in the same Process table which tells
the player the bird is present and if it has left the ticket.
_	BIRD	SAME	12	38
	MESSAGE	9
	ISAT	4	252
	MESSAGE	10
Finally select the Response table option and insert the entry:
GET	TICKE	SAME	12	38	;Bird at same location?
		ISAT	4	252	;with ticket in beak?
		CLEAR	5		;Force it to fly away
		NOTDONE			;"I can't do that"
This will trigger before the GET _ entry and prevent the "There
isn't one of those here" message being produced if the bird is
present with the ticket.
CLEAR is an action which is followed by a flag number and sets
the flag to have the value 0. This will cause the bird to fly
away (which it might have been going to anyway) simulating its
fright at having a great hand descend on it to get its prized new
possession.
NOTDONE is an action similar to the DONE action but it fools PAW
into thinking that nothing was done and thus causes it to print
the "I can't do that" message.
Now the moment of truth, upon testing the game you should be able
to watch the bird fly in and out of the bandstand and the branch,
play with the game for a while to see that fact that the bird
does indeed to continue its roving existence. Then try dropping
the sandwich at the same location. Note that if you do not pick
up the ticket before the bird flies away it will snatch the
ticket back.
The Dog
The dog will be added to complicate the game a bit more. The dog
will simply follow the player everywhere (being a very obedient
dog) and frighten the bird off. Now a dog would not be able to
climb the tree so we must prevent the player from tempting the
bird with the sandwich on the branch. To do so we will arrange
for any object dropped while on the branch to fall to the ground.
The player will be able to get rid of the dog by putting the lead
on it and then tying the lead to the bench. In addition the
player will be able to 'speak' to the dog which will provide
another way of getting rid of the dog by asking it to SIT or
STAY.
Before we examine the entries in Process and Response needed to
control the dog insert the following words (into vocabulary) and
messages (into the messages table) which will be needed.
Verbs		Noun
TIE	34
UNTIE	35
SIT	36
STAY	36
COME	37	HERE 37

Message	15
The _ falls to the ground at the foot of the tree.
Do not change the colour of this message and ensure you include
the underline as it serves a special purpose we will discuss
later. Most of the remainder of the messages deal with the dog
and should be entered in magenta (EXTENDED MODE, CAPS SHIFT & 3)
nto forgetting to reset white at the end of them. do not do this
for messages 21,22,23 and 25. This colour coding allows the
player to see exactly what each message is referring to.
Message 16
The dog's bright eyes stare at me with mindless love.
Message 17
A dog is here.
Message 18
The dog follows me wagging his tail.
Message 19
A lead trails behind the dog.
Message 20
The dog is tied to the bench by a lead.
Message 21
Trustingly the dog lets me put the lead around its neck.
Message 22
I've tied the lead to the bench.
Message 23
Who should I say it to?
Message 24
The dog is sitting quietly.
Message 25
I've untied the dog from the bench.
There is no real need to make the control routine for the dog a
separate process table as it is only one entry, but we shall do
so in case you wish to expand the game later.
Flag 13 will contain the current location of the dog.
Flag 14 will contain: 0 - the dog is free to roam, 1 - the dog
has the lead around its neck, 2 - the dog is tied to the bench,
255 - the dog is sitting quietly.
From the Process table menu; Begin a new process table (this
should be table 4) and insert the single entry:
_	DOG	NOTSAME	13	38	;Dog not where player is?
		LT	14	2	;Still able to move?
		NOTAT	8		;Player isn't up the tree?
		COPYFF	38	13	;Move the dog to players locno.
		MESSAGE	18		;tell them its followed...
You should be able to work out what NOTSAME, NOTAT and COPYFF do
but the technical guide will help you out if you have problems.
LT is a condition which succeeds if the flag specified contains a
value Less Than the specified value.
Insert into process table 2;
_ DOG PROCESS 4
which if you use P to look at the table should come before the
entry for the bird (if not you entered the two vocabulary words
the wrong way round). This ensures the dog will be moved to the
players new location before the bird is checked.
Similarly to the bird entries are required in process table 1 to
inform the player of the dogs presence:
_	DOG	SAME	13	38	;Dog at same location
		MESSAGE	17		;tell player
		EQ	14	1	;with lead?
		MESSAGE	19		;yes so tell player

_	DOG	SAME	13	38
		EQ	14	2	;Dog tied to bench?
		MESSAGE	20

_	DOG	SAME	13	38
		GT	14	2	;255 is greater than 2 so
		MESSAGE	24		;tell player dog is sitting
while you are in process 1 modify the * * entry to contain a LET
13 2 (before the GOTO) to make the dog start at the bus stop.
Now in order for the bird to be frightened away by the dog we
need an extra entry in process table 3. Now the entry must go
before the entry which decides to drop the ticket and after the
entries which make the bird fly. This will ensure that the bird
will fly away with the ticket if it has it and leave it if it
does not. So we need to insert before the sixth entry, use
[I _ BIRD 6] to achieve this and type in the condacts for the
entry from its listing below.
_	BIRD	SAME	12	13	;Bird and dog at same location
		LET	12	8	;Only ever on bandstand so
        	LET	5	3	;move to branch, three phrases
		AT	5		;Player on bandstand?
		MESSAGE	13		'tell them bird is gone..
The number after insert/amend has a maximum value of 255 so do
not insert more than 256 entries of the same word values (that
would be pretty unmanageable anyway) is you want to retain the
ability to insert anywhere as well as on the end of the list.
The last change to the process tables is to insert a sub-process
which will be calling from Response to deal with speech to the
dog. The mechanism works very simply. If the player includes a
phrase in double quotes ("") in the input sentence, then the
parser will save where it was and carry on with decoding the
phrase. There is an action called PARSE which instructs PAW to
use the parser to decode the string the player types in, this
then becomes the LS. It is only sensible to do this in a subprocess
as PAW will try to match the new LS against the rest of
the table. Begin a new Process table (table 5 should be next) and
insert the following entries:
*	*	PARSE			;Convert string to LS
		MESSAGE	16		;Not valid phrase so
		DONE			;dog does not understand!

SIT	_	ZERO	14		;Dog not partially tied up?
		SET	14		;now sitting quietly
		MESSAGE	24		;tell player (always at same
		DONE			;place as dog) Then DONE

COME	_	EQ	14	255	;Dog must be sitting
		CLEAR	14		;Now normal
		MESSAGE	18		;Dog follows
		DONE

_	HERE	EQ	14	255
		CLEAR	14
		MESSAGE	18
		DONE
_	_	MESSAGE	16		;Anything else.
We get around the limited vocabulary that the dog understands by
making him wag his tail for most things!
PARSE will allow PAW to continue looking at condacts if it fails
to find a valid phrase, be careful here as the current LS may be
a bit jumbled up (i.e. the parser managed to get some sense out
of the phrase) so you should normally only print a message like
"They didn't seem to understand" or some such similar and DONE to
return to your calling action. If it does form a valid LS PAW
will start to search the following entries for match as with
Response. PARSE should only be used in a sub-process called from
Response it has no meaning in any table.
Notice how the COME and HERE entries deal with a variety of
phrases that the player might try to call the dog again having
made it sit.
The _ _ entry catches all the valid LS which may have been in the
string and the dog has no specific response to.
Select the Response table now to allow us to insert the extra
entries to control speech and the dropping of objects in the
tree.
First off the mark is the entry which causes all objects dropped
in the tree to fall to the ground, now this must go between the
entry which deals with putting objects in the bag and the normal
DROP _ entry (actually printed as PUT!). [I PUT _ 1] will achieve
this, the entry is:
PUT	_	AT	8		;Player on branch
		WHATO			;I say old boy!
		LT	51	255	;Valid object?
		EQ	54	254	;Object carried?
		MESSAGE	15		;its now bottom of tree.
		PUTO	7		;put it there
		DONE
This is an example of creating an automatic action of your own,
like AUTOG and so on.
WHATO is an action which looks up the first Noun in the current
LS in the object word table, converting it into an object number.
This number is then placed in flag 51. Flag 51 always contains
the number of the last object referenced by PAW and whenever it
is set the associated flags 54 to 57 are also set. Flag 54 contains the current location of the object.
PUTO is an action which changes the location of the currently
referenced object to be the one specified.
Message 15 contained an underline. Whenever PAW meets an
underline in text (be it message or location) it replaces it with
the current object hence the message is changed to suit the
object currently being dealt with.
Next a relatively simple entry to deal with PUT LEAD ON DOG:
PUT	LEAD	PREP	ON		;Ensure not a DROP LEAD
		NOUN2	DOG
		CARRIED 5		;Played has the lead
		SAME	13	38	;is at same location as dog
		LET	14	1	;Dog now has lead on
		DESTROY	5		;so player hasn't
		MESSAGE	21		;tell them so.
		DONE
The entries which follow deal with a new concept again, the
modification of the current LS. We want the game to understand
both TIE DOG TO BENCH and TIE LEAD TO BENCH as the the same
thing, now LEAD and DOG are separate word values, so the TIE DOG
entry which will come first in the table (as its word value is
lower that LEAD) converts the Noun into LEAD (55) and allows PAW
to carry out the TIE LEAD entry! A similar system is used for
UNTIE. Insert the entries:
TIE	DOG	LET	34	55	;Flag 34 is Noun for LS
TIE	LEAD	PREP	TO
		NOUN2	BENCH
		AT	4		;Where bench is.
		SAME	13	38	;dog is here
		EQ	14	1	;with lead on
		PLUS	14	1	;now tied to bench
		MESSAGE	22		;tell player about it
		DONE

TIE	_	NOTDONE			;Ensure an I can't

UNTIE	DOG	LET	34	55	;Flag 34 is Noun for LS

UNTIE	LEAD	AT	4		;Where bench is.
		EQ	14	2	;dog tied to it
		CLEAR	14		;Now free
		MESSAGE	25		;Tell player
		CREATE	5		;Recreate lead
		GET	5		;Try and get it.
		DONE

UNTIE	_	NOTDONE			;Ensure an I can't
The NOTDONE makes sure PAW reports "I can't do that" if you try
and TIE or UNTIE anything other than the lead/dog.
CREATE is an action which is followed by an object number. It
causes that object to be at the position where the player is.
GET is an action which is followed by an ibject number. It
attempts to get the specified object.
We use these actions instead of just placing the object at 254 so
that any weight and/or number of objects carried problems are
reported.
Finally the the entries to allow speech to the dog, we have also
included the entry necessary to allow you to speak to the bird -
it just ignores you!
SAY	DOG	SAME	13	38	;It's here
		PROCESS	5
		DONE

SAY	BIRD	SAME	12	38
		MESSAGE	8
		DONE

SAY	_	MESSAGE	23		;Who?
		DONE
Notice that we do not ensure the preposition TO is specified -
this allows the player to shorten their input if required. As a
general guide don't check for an extended LS unless it is
required to differentiate two similar phrases.
As a final test the following inputs should now work in the
indicated situations, they show some of the power which the
parser can provide your games with.
When on the path by the park bench with the lead and dog try;
PUT LEAD ON DOG AND TIE IT TO THE BENCH
then to untie it;
UNTIE DOG
When up the tree with the bag try;
PUT ALL IN BAG AND DROP IT. GO DOWN AND LOOK IN BAG
To make the dog sit down;
SAY TO DOG "SIT"
and get back up;
ASK DOG TO "COME HERE"
Do it yourself
Before we move onto a discussion of the graphics here are a few
points that you might like to tidy up in the demonstration game
as practice on using the system (after the graphics if you like).
1/ EXAMINE should respond to all objects even if it is with a
general reply such as "I see nothing special about the _.".
Hint: so as not to lose the use of LOOK on its own you could use
a condition LT 34 255 before triggering (i.e. ensure a Noun was
actually specified).
2/ The bird should really fly away if you GET SANDWICH while the
bird is present. i.e. it will be pecking at the sandwich and any
normal bird would fly...
3/ UNTIE _ and TIE _ should have a message something along the
lines of "Tie what to what?", NOTDONE was an easy copout!
4/ How might you deal with the player typing PUT object IN BAG
when the bag is not rpesent? at the moment the game will drop the
object instead, why?
5/ Nothing was ever done with the torch, the following entries
will allow it to be turned on and off (you will also need TURN as
a verb in the vocabulary):
TURN	TORCH	PREP	ON
		CARRIED	7
		SWAP	7	0
		OK

TURN	TORCH	PREP	OFF
		CARRIED	0
		SWAP	0	7
		OK
Lookup the extrac condacts in the technical guide and read the
chapter on light and dark - perhaps a cellar could be created
below the bandstand? The movement would have to be checked in the
Response table with an entry such as: (assuming 9 is the new
location).
DOWN	_	AT	5	;Player on bandstand?
		SET	0	;Flag 0=255=Dark!
		GOTO	9	;New location
		DESC
Not forgetting an entry for UP which clears the flag!
6/ What happens if the player types CLIMB TREE or CLIMB UP TREE
and what is the best way to check for this? Hint: there is only
one thing you can climb in that location.
Overlays
The 128K user will still not need to use overlays yet, but may
find it useful to read this chapter anyway.
The idea of overlays was explained in concepts, in order to
proceed with the graphics and text compression system the 48K
user will have to load an overlay.
PAW will do most of the work for you, if you just select the main
menu option you require you will be asked to confirm you want to
load an overlay, any key other than Y will return you to the main
menu. If you do not proceed PAW will print the name of the
overlay it is searching for on the screen.
The five overlay files are at the end of the main program (which
is where your tape will be after loading PAW). If you have a tape
counter it is worth setting it to zero at this point and then
noting down the readings for each overlay, fast forward can then
be used to go to just before the required file. The five files
are in the order shown below, also described are the main menu
options contained within each (note that the selection of an
option present in the current overlay is automatic):
PAWOVR	1 Interpreter, Test Game, Save/Verify Adventure.
PAWOVR	4 Process/Response, Vocabulary, Connections, Words.
PAWOVR	5 Messages, Locations, Objects, Initially At,
	  Object Weight and Background colours.
PAWOVR	2 Compressor.
PAWOVR	3 Character Editor/Graphics Editor.
Note that Save, Verify and Load database along with Free memory
are always available as they are part of the main menu.
Once the file has loaded you will be presented with the sub-menu
as normal. If an error occurs you will be returned to the main
menu, just reselect the option and try again. (Note that any
overlay loaded previously will be erased by a tape error, so
you will be able to do nothing but load a new overlay - or
save/load database which is always available).
If you do not have a tape counter or wish to make things even
simpler you might like to transfer each of the files to a
separate tape, they are just normal CODE files.
Text Compression
Option K on the main menu (48K users will have to load the
overlay at this point) will ask you is you want to compress the
database, any key other than Y will return you to the main menu.
Otherwise the text compressor will reduce the amount of memory
needed for the text in your game by grouping common letters into
a single 'token', this can take anything from one minute to an
hour depending on the size of your game. On the demo this should
take about a minute and save about 900 bytes!
The only difference you will notice is when editing existing text
where the cursor will jump two, three, four or even five
characters at a time - including deleting. Just retype all the
letters separately if you make a correction which requires them
to be deleted, they will be compressed the next time you use the
compressor. Note that the compressor uses the normal spectrum
tokens, which will produce letter groupings and not the keywords
after you use the compressor, so do not use the tokens if you
intend compressing the database.
The Character Editor
Just quickly we will take a look at the character editor. Select
option Q from the main menu - 48K users will need to load an
overlay. This sub-menu allows you to change the way the
characters which are displayed on the screen look. You can have
upto five different character sets in memory, and change between
them at will using ESCC 0-5 or a CHARSET action in Process or
Response. The sets are numbered 0 to 5, set 0 is the normal set
which can not be changed, except for character values 0 to 15
which are the shade patterns and 144 to 165 which are the normal
spectrum UDGs. If you use [P] to look at the table you will find
only these characters displayed. Note that you have to Insert a
blank set before you can change or load it which conserves memory
in the database if you are not changing the character set.
At the moment we are just going to use the editor to change one
of the shade patterns. These are just normal characters which the
graphics system can use to colour in an area of screen with.
[A 0 15 ENTER] will allow you to edit character 15 of set 0. This
is an unimportant shade pattern which we will be altering to
represent the iron work on the bandstand.
Each character in PAW is defined on an 8 by 8 pixel grid, the top
left box on the screen will be showing an enlarged version of the
pattern as it is at the moment, the top centre and right boxes
show how it will look when used as a shade (both normal and in
inverse) while the bottom gives a summary of the commands
available and current character under edit. Use the cursor keys
(CAPS SHIFT 5 to 8 on 48K) to move the red flashing cursor
around the grid and the SPACE key to 'toggle' the pixel it
is over on/off (that is; if the pixel is on - black - it
will be turned off,and if off - yellow/white - it will be
turned on. try it and you will soon see what we mean!).
The pattern we require is shown in Diagram 5. When you have finished use [R] to
redraw the two shade boxes to see what the new pattern looks
like. And finally press ENTER to end the edit.
Side two of the supplied cassette contains 22 different character
sets which can be loaded into character sets 1 to 5, after you
have inserted them of course. After insertion of a set the option
to select that set as the default will be offered on the
Background colours option of the main menu.
The Graphics Editor
The graphics system on PAW used a method of drawing called Line
and Fill which is very efficient on memory usage for the type of
pictures included in adventure games. Instead of storing an image
of the screen that you have drawn like many commercial art
packages, it stores a list of the commands you used to draw it.
Even the most complex of pictures will only consumes 2K of memory
as compared to 6K for a standard screen, and indeed you should
find that effective designs can be drawn using as little as 100
bytes!
The list of commands stored is called a drawstring, and there is
a drawstring for every location you insert using the locations
option on the main menu. If you are illustrating only a few of
your locations the other drawstrings will be empty.
Every picture (and therefore every location) has a Paper and Ink
colour defined for it. Select option D from the main menu and you
will be presented with a sub-menu to deal with amending these
values, use [P] to see that an entry exists for our 9 locations
in the demo game. They are all marked as a subroutine which tells
PAW two things:
1/ Do not draw this picture when you describe a location.
2/ The is a sub-picture which can be used in other pictures.
The sub-picture facility is similar to the sub-process idea
discussed previously and an example of its use if given later.
For our example of using the graphics we shall be drawing a
picture of the bandstand as seen from location 4 (on the path).
So we want to make PAW draw the picture when we visit the
location. You do this by assigning the picture a Paper and Ink
value, we will use a black background and Yellow ink so type
[A 4 0 6 ENTER], if you now use [P] the entry for location 4
should be:
Location 4 Paper: 0 Ink: 6
You could change it back if you wanted by leaving the paper and
ink values out of the amend (e.g. A 4). Leave it as it is for the
moment and select option G from the main menu. 48K owners should
have found that they did not need to use overlays again - this is
because Characters, Default colours and Graphics are all in the
same overlay, the use of the amend option in a moment will wipe
out the overlays which PAW holds in memory and if you wish to use
any other options except Save/Load or Free memory you will need
to load the overlay containing the option.
So on with the graphics; several option are provided on the menu
to allow you to amend, print (on the screen), copy (to a
printer), calculate the size of and dump a screen image of each
picture in the game. We will be creating a picture for location 4
so type [A 4 ENTER]. The screen will clear and two lines of
information will appear in the lower screen, this shows from
left to right; On the top line the current drawing ink colour,
the current background paper colour, the status of the flash and
brightness options and on the lower line the current x,y
coordinate of the drawing position and the location number under
edit. Sundry other information is also displayed at times which
will be explained as necessary.
It you look carefully you should also see a single flashing pixel
in the bottom left, this is known as 'the point' and indicates
the start position for any drawing. If you press key E you should
see a line start to appear, the one end of the line is always at
point and the other end of the line can be moved using the keys
around S as follows:
Alternatively if you have a joystick you can plug it into port 2
(Plus 2 and Interface 1). Kempston interface users should press
[SYMBOL SHIFT] and [J] to activate the driver for it - a letter J
will appear on the bottom line to indicate it is active. The
joystick will now move the end of line around. Movement will be
by single pixels, this can be accelerated to eight pixels at a
time by holding down the CPAS SHIFT key at the same time as one
of the eight keys (or while pushing the joystick in a specific
direction).
The line is 'rubber banding' (a term which arrives from the fact
it acts like a taut rubber band) and will allow you to position
line accurately before you draw them.
Our sample game is going to have 'split screen' graphics so we
want to leave several lines spare on the screen below the picture
for text. Press [SYMBOL SHIFT] and [Y] to activate a grid which
shows the character boundaries and move the line to X=0,Y=47. We
are going to move 'point' to the end of the line so that any
drawing starts at that pixel, press [SYMBOL SHIFT] and [P] for
PLOT to achieve this, the current point will now be where the end
of the line was. Next move the line to X=255,Y=47 using [A] once
which demonstrates the 'wraparound' action of the line (i.e.
moving off one side of the screen brings it back on the other
side). This time we want to actually draw the line (this is
called fixing the line) so press [SYMBOL SHIFT] and [L] for LINE
- or use FIRE on the joystick which acts like SYMBOL SHIFT and L.
If you make a mistake you can delete the previous command by
pressing DELETE (CAPS SHIFT and 0 on 48K) - all the way back to
the start of the picture if you like!
All graphics commands which insert in the drawstring (like PLOT
and LINE) require SYMBOL SHIFT to be held down so we shall
shorten it to SS, and any co-ordinates given will be in the form
X,Y e.g. 255,47 instead of X=255,Y=47.
Borders around pictures seem to be the fashion at the moment so
ours shall have one! Move the end of line to 248,55 and PLOT the
point, now draw a box by moving to 248,168 and fixing the line,
then onto 7,168 and fixing the line and so on for points 7,55 and
back to 248,55. Note that these lines just skirted the outside of
each character 'cell'. Because of the spectrums limitation of
only two colours in each cell you must be careful in your
positioning of lines (some hints are given in the technical
guide), or you will find them changing colour later when you draw
near them. Finally to make our border a little more interesting
we shall use the shade option mentioned earlier. Move the end of
line to 248,53 and press [SS] & [S] for SHADE; the lower screen
will change to a request for a pattern number, type in
[12 ENTER], you will be asked for a second pattern, this pattern
would be overlaid on the first, but we want to use pattern 12 on
its own so type [12 ENTER] again. The border area should be
magically shaded with fine diagonal lines. Note that point has
not moved and the line will grow from same place as before the
shade.
The shade command is as you will have noticed very fast, it is
also very good at shading unusually shaped areas of screen,
including worming its way through single pixel 'holes' in your
picture. Of course you can delete an errant shade. The shade
area is defined by at least a single pixel line or the edges of
the screen as in the border detailed above. It will not always
shade the entire empty area, but careful positioning will allow
most of it to be shaded in one go, any unshaded areas can be
completed by using the shade command again with a start point
within the empty area. Shade is provided with sixteen possible
default patterns which you can change using the character editor
as detailed earlier. Note that if you change a pattern all uses
of that pattern in pictures will be changed as well, so it is
best to choose useful general patterns for the majority and
define only a few special patterns where absolutely necessary.
Patterns can of course be mixed together by specifying different
pattern numbers when prompted to provide a wide variety of useful
designs.
Now we shall lay down the main sky and grass areas. We are merely
going to set down a paper colour so move the line to 8,56 and
press [SS] & [A] for ABSOLUTE MOVE, this does not affect the
pixel unlike PLOT. Press [SS] & [Y] to get rid of the grid or you
will not be able to see the colours. The grass will be green so
press [SS] & [C] for PAPER, green is colour 4 so type [4 ENTER],
note that the current paper colour changes to be 4. Now move the
line to 246,87 and press [SS] & [B] for BLOCK which will colour
in the rectangle of character cells which the line forms the
diagonal of, with the current Ink and Paper colours. The sky will
be blue so ABSOLUTE MOVE the line to 247,88 ([SS] & [A]), select
blue paper ([SS] & [C], [1 ENTER]), then BLOCK the rectangle to
8,167 (move to 8,167 and press [SS] & [B]).
Now we shall draw the base of the bandstand in red brick. In
order that we avoid the colour boundary problems the base will be
exactly three character cells high and sixteen wide. Select red
paper ([SS] & [C], [2 ENTER]), and black ink using [SS] & [X] for
INK, 0 is black so type [0 ENTER]. Now PLOT the point at 191,72
(i.e. move the line to 191,72 and press [SS] & [P]). Then fix
lines between each of the following points;
64,72 64,95 111,95 111,75 144,75 144,95 191,95 191,72
One of the shading patterns which you may have noticed earlier is
a brick type pattern, move the line to 189,73 and SHADE using
pattern 14 (i.e. [SS] & [S], [14 ENTER 14 ENTER]) to create an
effective brick base.
Your picture should look like diagram six by now. To create the
steps up to the bandstand move the line to 144,78 and press [SS]
and [R] for RELATIVE MOVE which moves point like PLOT
and ABSOLUTE MOVE but to a pixel a fixed distance from
the current point instead of an absolute x,y position. It
is used to keep groups of commands which draw a single
object in the picture together, the reason will be
demonstrated in a moment. Fix a line to 112,78 and then use
RELATIVE MOVE to move to 111,81, fix a line to 143,81
and so on for each of these coordinate groups:
REL MOVE to 144,84 LINE to 112,84
REL MOVE to 111,87 LINE to 143,87
REL MOVE to 144,90 LINE to 112,90
REL MOVE to 111,93 LINE to 143,93
We will now examine the editing facilities that are available to
correct mistakes in addition to DELETE. As an example we will
move the entire brick base of the bandstand two character cells
further to the right. To DELETE all the way and redraw seems a
bit too much like hard work!
As you draw your picture PAW adds each command to the drawstring,
where it adds them is called the drawstring pointer and at the
moment the drawstring pointer is at the end
of the drawstring. it is quite feasible for
PAW to backtrack along the commands you have
entered so far to any point along the
drawstring. Press [CURSOR RIGHT] once, don't
worry the picture is still there, but PAW
only draws the picture as far as the
drawstring pointer, which is now at the
START of the drawstring, Diagram 7 might
help you to visualise the way the
drawstring works in memory. You can step
forward one command in the drawstring by
pressing [CURSOR DOWN] for NEXT command,
and back one command using [CURSOR UP] for
PREVIOUS command - note that this does not
delete the command it merely moves the
drawstring pointer back one command.
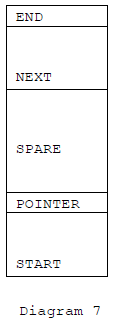
Use NEXT (CURSOR DOWN) until the PLOT (at
191,72) command which starts the brick base is carried out. Use
DELETE to remove it from the drawstring and PLOT 207,72 which PAW
will insert in the drawstring at the pointer. If you use NEXT now
the base line should be drawn, rather than use NEXT all the time
to get to the end of the drawstring a useful trick especially to
where you are near the start on a long drawstring is to press
[ENTER] which will finish the edit and return you to the submenu.
Then type [A 4 ENTER] to amend the picture again, presto
your drawstring pointer is at the end again. Notice how the
entire base moved as a unit because we used RELATIVE MOVE when we
originally drew it.
To draw the front balustrade of the bandstand select ink white
([SS] & [X], [7 ENTER]) and paper 8 ([SS] & [C], [8 ENTER]) -
which is a special 'colour' meaning do not affect the paper
colour. Then:
PLOT 206,96 LINE 209,109 LINE 162,109 LINE 162,96
move the line to 162,97 and SHADE using the pattern you designed
earlier 15, ([SS] & [S], [15 ENTER 15 ENTER]).
PLOT 125,96 LINE 125,109 LINE 81,109 LINE 81,96
move the line to 82,97 and SHADE in pattern 15 again.
Now the upright poles for the pagoda:
PLOT 103,96 LINE 103,136 LINE 106,136 LINE 106,96
move the line to 104,121 and press [SS] and [F] for FILL, this
fills the defined area completely in set pixels in a similar way
to shade.
REL MOVE 184,96 LINE 184,136 LINE 181,136 LINE 181,96
move the line to 183,122 and FILL, ([SS] & [F]).
The top of the pagoda:
REL MOVE 207,143 LINE 206,140 LINE 202,136 LINE 86,136 LINE 83,139 LINE 80,143 LINE 207,143
move the line to 205,141 and SHADE in pattern 15.
REL MOVE 144,166 LINE 220,139
REL MOVE 65,139 LINE 144,166
To create a rounding effect on the pagoda select OVER by pressing
[SS] and [O], a letter O will appear on the top status line to
indicate that over is active. Normally every PLOT and LINE
command sets the pixels if affects, but those inserted while over
is active will set pixels that are reset and reset pixels that
are set, much like the toggle action of SPACE on the character
editor. Note that the state of Over (and Inverse introduced
later) is encoded as part of the command, to get the effect you
have to insert the command while it is active, you cannot change
a PLOT or LINE inserted previously without deleting it first.
Over is cancelled by START, PREVIOUS or DELETE.
LINE 115,140 REL MOVE 144,166 LINE 171,140
and [SS] and [O] to turn over off again, you should now have two
lines drawn partly in reset and partly in set pixels.
The last upright on the pagoda:
REL MOVE 142,136 LINE 142,96 LINE 145,96 LINE 145,135
move line to 143,133 and FILL.
The back balustrade of the bandstand is drawn slightly smaller:
REL MOVE 125,107 LINE 161,107
REL MOVE 162,96 LINE 126,96
Inverse causes any PLOT and LINE commands to reset pixels instead
of setting them. So:
REL MOVE 141,95 LINE 141,107
REL MOVE 146,108 LINE 146,96
move line to 128,98 and SHADE in pattern 15, and to 150,98 to
SHADE in pattern 15 again. To improve the look we shall make the
centre upright stand out a bit by removing a line of pixels
either side of it. Press [SS] and [I] for INVERSE and a letter I
should appear on the bottom line to show Inverse is active.
Inverse causes any PLOT and LINE commands to reset pixels instead
of setting them. So:
REL MOVE 141,95 LINE 141,107
REL MOVE 146,108 LINE 146,96
then Inverse off ([SS] & [I]).
Now to construct the railings around the perimeter of the park we
shall use a useful technique of undrawing the surround of a shade
pattern. Draw in black ink ([SS] & [X], [0 ENTER]):
PLOT 8,104 LINE 79,104 LINE 79,88 LINE 8,88
PLOT 247,88 LINE 208,88 LINE 208,104 LINE 247,104
SHADE pattern 7 at 246,102 and 11,102. Undraw the top of the
railing to create spikes by turning Inverse on ([SS] & [I]) and:
PLOT 247,104 LINE 208,104 PLOT 79,104 LINE 8,104
then Inverse off. To finish the effect draw:
PLOT 8,101 LINE 79,101 PLOT 208,101 LINE 247,101
The main picture is finished but we are going to add some tufts
of grass using the subroutine feature mentioned earlier, this
will save memory and the time taken to draw four tufts of grass.
Press [ENTER] to finish the edit and return to the sub-menu. Now
location 0 is the title screen for the demo so we shall use its
drawstring to contain our tuft of grass. Using [A 0 ENTER] amend
the picture for location 0. Note that the location number is
followed by a letter S to indicate that this is a subroutine.
Draw the tuft of grass by temporarily plotting 72,72 and fixing
lines between the following points:
68,85 77,73 74,89 81,73 79,94 87,72
87,94 92,70 94,86 95,70 99,79 98,69
now return to the START of the drawstring ([CURSON RIGHT]) and
use NEXT ([CURSOR DOWN]) to step past the PLOT, then use DELETE
to remove it. This strange action means that the start of the
first line is at 0,0 and allows us to position the picture
accurately. If you try and amend the picture again you will get
an "Out of range" error because PAW cannot draw a line 'off'
screen. Your drawstring pointer will be positioned just before
the first LINE command so insert the PLOT again while you edit
the drawstring, deleting it again at the end.
Amend picture four again ([A 4 ENTER] from the sub-menu) and PLOT
point 217,69. Now press [SS] and [G] for GOSUB, you will be
prompted for a location number to use, type [O ENTER] to use our
newly defined tuft of grass. Next you will be prompted for a
scale, this defines how big the picture will be in eights of its
original size, type [4 ENTER] to draw it as half its original
size. Do the same for the following:
PLOT 21,58 GOSUB 0 scale 5
PLOT 60,74 GOSUB 0 scale 3
PLOT 103,61 GOSUB 0 scale 4
And to demonstrate errors:
PLOT 128,170 GOSUB 0 scale 0
Scale 0 actually means full size, not zero eights! The error
which was generated has left the drawstring pointer before the
command which caused the error, in this case the GOSUB. There
would appear to be no way to delete this without plotting further
down and so on. In fact [GRAPH] ([CAPS SHIFT] & [9] on a 48K)
will DELETE the NEXT command, you might as well [DELETE] the PLOT
as well.
Note that at the end of an edit it is possible for you to still
have commands above the drawstring pointer that you do not want,
you can ensure these are removed by holding down DELETE NEXT
([GRAPH]) for a while.
Return to the main menu and select the Response table option (48K
owners will need to load an overlay). Amend the * * entry to
contain MODE 3 3 LINE 16 before the GOTO 2. The MODE action
selects the way the screen operates, mode 3 is a fixed graphic
area (any text displayed will not remove it), the second 3 tells
PAW not to change the border colour and to print "More.." when a
screenfull of text is to be displayed.
Finally use test adventure (again 48K owners will need to load an
overlay) to see your picture in action. It will be displayed the
first time you visit the path, but not on subsequent visits. This
is known as normal mode for graphics. It is also possible to
select On and Off which always draw and never draw the graphics
respectively. These options can be selected using PIC NORM, PICS
ON and PICS OFF - those entries we didn't explain in Response!
You must make the decision as to whether to allow the player to
switch between options during the game or to force a single
method at start.
End of the road
We hope that the above tutorial has provided an insight into some
of the many powerful facilities of the Professional Adventure
Writer. Now it is time for you to expand your knowledge of the
system by using it! The Technical Guide will provide an exact
specification of everything that PAW contains and in conjunction
with the essays in it on various subjects, will form essential -
if a little heavy - reading when writing your own games.
Finally you will find a small game in database form on the
cassette after the overlays called "TEWK", which should be loaded
using option J on the main menu (after saving your database of
course!). Looking through this should provide you with some more
ideas on giving your game an individual look.
"What should I do next?"
HAVE FUN!
"OK"
Tim Gilberts - January 1987
- ends -
|